

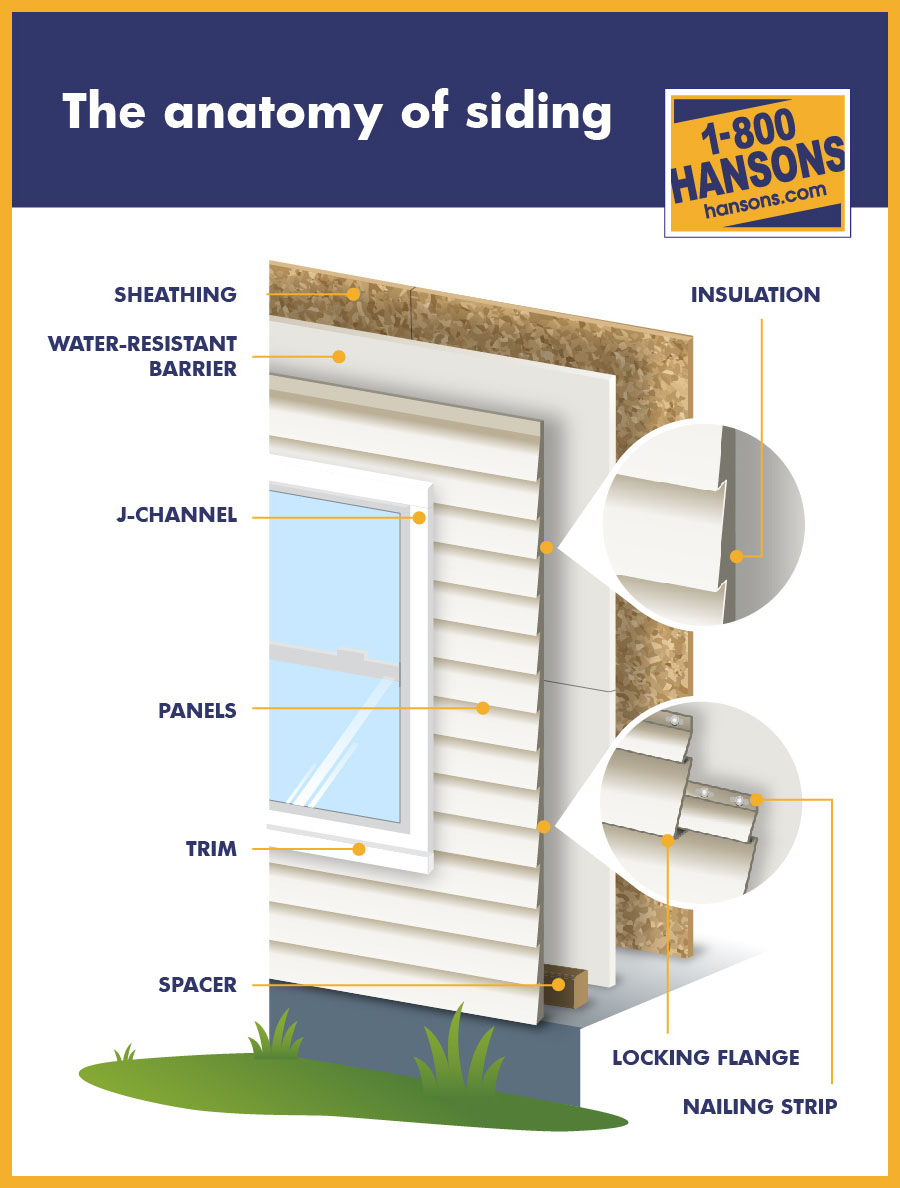
Plan, flash, trim, then hang interlocking panels from level starter strips.
If you want to learn how to install aluminum siding the right way, you’re in the right place. I’ve helped homeowners and small crews complete clean, long-lasting installs across many climates. In this guide, I break down how to install aluminum siding from prep to finish, with pro tips, real mistakes to avoid, and steps that pass inspections.

Planning and Safety Essentials
A solid plan is the base for how to install aluminum siding. Aim for straight lines, dry walls, and safe cuts. Check local codes and the manufacturer’s install guide. Both drive key rules on flashing, fasteners, and clearances.
Put safety first. Aluminum edges are sharp. Ladders and saws add risk. Wear gloves, eye and ear protection, and stable shoes. Use a sturdy ladder on level ground. Do not work in high winds.
Walk the job. Look for rot, bowed walls, and tricky roof lines. Plan your trim kit and order 10–15% extra for waste. Note power lines and service meters. Call for a utility mark-out if you may fasten near hidden services.
Tools and Materials Checklist
The right tools speed up how to install aluminum siding. Good tools also give a better finish. Keep them close and safe.
Core tools
- Tape, speed square, chalk line, 2–4 ft levels
- Tin snips, aviation snips, utility knife with fresh blades
- Siding brake for coil trim, if wrapping fascia or posts
- Circular saw with fine-tooth non-ferrous blade (optional)
- Snap lock punch and nail slot punch
- Hammer or siding nailer with depth control
- Caulk gun, sealant rated for exterior metal
- Ladder, pump jacks, or scaffold
Materials
- Aluminum siding panels, profiles, and colors
- Starter strips, J-channels, undersill trim
- Inside and outside corner posts
- Drip cap (Z-flashing) for heads
- Housewrap, flashing tape, and self-adhered flashing
- Rigid foam or fanfold underlayment (as needed)
- Non-corrosive fasteners: aluminum or stainless siding nails or screws
- Coil stock for custom trim
Pro tip from the field: avoid mixing metals. Steel fasteners on aluminum can cause galvanic corrosion. Use aluminum or stainless fasteners with large heads. Do not drive nails tight.

Preparing the Wall Surface
Clean prep is vital in how to install aluminum siding. Your new skin is only as good as the face under it. Fix rot and water issues first.
Steps
- Remove old fixtures, downspouts, and loose cladding. Save light blocks.
- Repair sheathing. Replace soft spots. Plane high spots.
- Install housewrap per code. Wrap shingle-style. Tape seams.
- Flash window and door flanges with self-adhered tape. Follow the top-last rule.
- Add fanfold or foam board if needed for flatness. Stagger seams.
Leave ground clearance. Keep the bottom course at least 6–8 inches above soil or mulch. At roof lines, hold the siding off shingles and add kick-out flashing where walls meet eaves.
Flashing, Housewrap, and Insulation
Water rules how to install aluminum siding. The goal is simple: shed water out and down. Flash every break in the skin.
Key points
- Housewrap laps go bottom over top. Think shingles on a roof.
- Use drip cap above windows and doors. Tuck under wrap at the head.
- Add backer rod and sealant only at trim joints. Never seal weep paths.
- In cold zones, consider rigid foam for a flat, warm wall.
- Hold fastener length to hit framing or code-approved sheathing.
Do not block drainage holes in the siding. Those slots let trapped water out. They also let walls dry.

Installing Starter Strips and Trim
This is the line you will see forever. In how to install aluminum siding, a true starter line makes every course lock clean.
Steps
- Find the lowest point of the wall. Snap a level line for the starter.
- Keep starter 6–8 inches above grade. Shim low spots as needed.
- Nail starter every 10–12 inches. Keep it straight and flat.
- Install outside and inside corner posts first. Plumb and secure them.
- Add J-channel at tops and sides where panels will tuck.
Leave expansion room at all trim. Most guides call for 1/4 inch gap in cold weather and up to 3/8 inch in hot weather. Check your brand’s table.

Hanging Aluminum Siding Panels
Here is the heart of how to install aluminum siding. Work from the bottom up. Keep lines level. Let the panels move.
Steps
- Lock the first panel into the starter. Check level.
- Nail in the center of slots. Space fasteners 16–24 inches on center.
- Do not drive nails tight. Leave about a 1/32 inch gap under the head.
- Stagger end joints. Overlap per the brand spec, often about 1 inch.
- Check each course with a level or laser. Adjust as you go.
- Cut panels with snips for clean edges. Support cuts to avoid bends.
- At the top course, use a snap lock punch and slide into undersill trim.
Field note: sun and shade can trick your eye. Step back often. Sight long walls from both ends. Small errors grow by the tenth course.

Finishing Corners, Windows, and Doors
Good trim work makes how to install aluminum siding look pro. It also keeps water out.
Corners
- Set outside corner posts plumb. Leave a 1/4 inch gap at the bottom.
- Feed panels into the post slots. Keep reveals even.
- For inside corners, run J-channel back-to-back or use inside posts.
Windows and doors
- Wrap the sill with flashing tape first. Then the sides. Head last with drip cap.
- Install J-channel on the sides and head. Notch the head J to drain.
- Leave gaps at the ends of panels in J. Do not caulk J weeps.
Gables and eaves
- Install J-channel along rakes. Keep a clean, straight line.
- Rip panels to fit. Punch locks near the top. Use undersill trim to hold.

Sealing, Venting, and Weatherproof Details
Water and heat shape how to install aluminum siding in every climate. Aim for a dry, vented wall that can move.
Tips
- Seal only where water can enter, like trim laps and flashing joints.
- Never seal bottom hems or J weeps. Those are drains.
- Use kick-out flashing at roof returns. It stops wall rot.
- Keep dryer and bath vents clear. Use code-rated vent caps.
- Maintain soffit vents if present. Do not choke airflow with trim.
In hail zones, choose thicker panels and deep profiles. In coastal areas, pick marine-grade fasteners and watch dissimilar metals.
Cost, Time, and Project Scope
Smart budgets help you plan how to install aluminum siding without stress. Prices shift by region and panel style.
Typical ranges
- Materials: about $3–$6 per square foot for siding and trims.
- Full install: about $6–$12 per square foot with labor.
- Add-ons: foam board, custom coil trim, and waste add 10–20%.
Timeline
- Small garage: 1–2 days for two handy people.
- Full house: 4–7 days for a small crew.
- Add time for rot repair, custom wraps, or complex gables.
I build a 10% time buffer. Weather and surprises always show up.
Common Mistakes and How to Avoid Them
These misses can ruin how to install aluminum siding. I have fixed all of them on call-backs.
Mistakes to avoid
- Driving nails tight. This causes waves and oil-canning.
- Skipping proper flashing. Water will find the gap.
- Starting out of level. Every course will drift.
- Mixing metals. Corrosion stains and fastener failure follow.
- Caulking weep paths. Trapped water leads to rot and mold.
- Ignoring clearances. Soil contact invites splash and pests.
Simple checks help. Before lunch and at day’s end, sight the wall. Re-snap lines if needed.
Maintenance and Repair Tips
Good care adds years to any plan for how to install aluminum siding. Most work is fast and simple.
Care routine
- Wash once a year with mild soap and water. Rinse well.
- Touch up small scratches with color-matched paint for metal.
- If panels fade or chalk, clean and repaint with acrylic latex for metal.
Repairs
- For small dents, back the panel with a block and tap with a rubber mallet.
- For deep damage, unlock and replace the panel from a seam.
- Keep spare panels from your lot for future matches.
Frequently Asked Questions of how to install aluminum siding
Do I need housewrap under aluminum siding?
Yes. Housewrap is a weather barrier. It lets walls dry while keeping bulk water out.
Can I install over old wood siding?
Often yes, if the old siding is flat and sound. Add fanfold or furring to create a smooth base.
What nails should I use?
Use aluminum or stainless siding nails with large heads. Nail in the center of slots and leave room for movement.
How much overlap do the panels need?
Most brands call for about 1 inch. Always check your manufacturer’s chart.
Can I cut aluminum siding with a circular saw?
You can, with a fine-tooth non-ferrous blade. Snips give cleaner edges and less burr.
Should I caulk around J-channel?
Only at joints where water can enter. Do not block weep holes or the bottom of J.
How far from the ground should siding start?
Keep 6–8 inches above soil or mulch. This reduces splashback and pest risk.
Can aluminum siding be painted?
Yes. Clean well, scuff if glossy, and use acrylic latex made for metal. Follow dry times.
Do I need foam board under the siding?
Not always. Use it to smooth walls or add R-value. Follow code for vapor control.
What if my walls are not plumb?
Shim starter and trim. Use furring or plane high spots to create a flat plane.
Conclusion
You now know how to install aluminum siding with a plan that lasts. Start with dry, flat walls, set a true starter line, and lock each course with room to move. Flash every opening, keep drains clear, and take time with trim.
Pick one wall and apply these steps today. Measure, plan, and run the starter. The rest will fall in line. Want more tips and checklists? Subscribe, ask a question, or share your project wins and lessons.