

Power washing vinyl siding is a practical way to keep your home exterior clean and extend its lifespan. If you’re a homeowner or property manager, you’ll want clear instructions before starting. This guide explains exactly what to do, when to do it, and what skill level you need. Most people can do this job safely with basic tools and careful attention. However, understanding the technical parts—like water pressure, siding details, and moisture barriers—makes the difference between a spotless result and costly repairs.
A clean exterior not only looks good but also protects your house from long-term damage. Mildew, algae, and dirt can build up quietly, especially in shaded areas, leading to stains and even structural problems if ignored. With the right process, you can avoid these risks and save money on repairs. Power washing is also faster and more effective than scrubbing by hand, making it ideal for large surfaces. Just remember: the details matter, and a small mistake can lead to leaks or cracked panels. Let’s walk through everything you need for a safe, thorough job.
Tools & Materials For Power Washing Vinyl Siding
Before you begin, gather the right tools and materials. Using the correct specs prevents damage and ensures a thorough clean.
- Pressure washer: Electric models (1,500–2,000 PSI) are best for vinyl siding. Gas models can be too powerful and risk cracking siding.
- Nozzle tip: Use a 25- or 40-degree nozzle. Narrower tips (0–15 degrees) may cause etching.
- Extension wand: For two-story homes, a telescoping wand (18–24 feet) is useful.
- Garden hose: Needed for rinsing and mixing.
- Cleaning solution: Use a non-abrasive, siding-safe detergent. Avoid bleach; use oxygenated cleaners.
- Soft brush: For stubborn spots.
- Protective gear: Safety goggles, gloves, closed shoes.
- Plastic sheeting/tape: For covering outlets, lights, and sensitive plants.
- Ladder: Only if needed—never pressure wash from a ladder unless absolutely necessary.
- Bucket: For manual cleaning of small areas.
Having all items ready saves time and reduces the chance of skipping steps. For example, if you forget protective gear, you may risk eye injuries from flying debris. Covering plants and outlets is easy with plastic sheeting and prevents unneeded repairs.
Specifications To Note
- Pressure range: 1,500–2,000 PSI
- Water flow: 1.4–2.0 GPM
- Nozzle angle: 25–40 degrees
- Detergent compatibility: Check manufacturer label
If your pressure washer is adjustable, always start at the lowest setting and increase only if needed. Some cheap machines don’t regulate pressure well, so test before starting. Using the right nozzle and flow keeps water from forcing its way behind the panels, which is a common beginner mistake.
Preparation Requirements
A safe, successful wash depends on proper preparation. Vinyl siding is part of your building envelope; mistakes can cause water intrusion or mold.
Sheathing & House Wrap
Before power washing, confirm siding is installed over:
- Exterior sheathing: OSB or plywood is standard.
- House wrap: Tyvek or similar, prevents moisture penetration.
- Flashing: At windows, doors, and horizontal joints.
Many older homes may lack modern house wrap, which increases the risk of leaks. If your home was built before the 1990s, it’s smart to check for upgrades or repairs in these areas. Even small gaps in flashing can let water through, so pay special attention to window and door edges.
Moisture Barrier & Building Envelope
- Ensure the moisture barrier is intact. Gaps allow water behind siding.
- Check for damaged or loose panels—repair before washing.
Moisture behind siding can stay hidden for months and cause mold, especially if the sun doesn’t hit that area. If you see warping or bulging, it’s a warning sign to repair before cleaning.
Local Code
- Follow local codes for siding installation and maintenance.
- Some areas require specific detergents due to environmental regulations.
For example, some cities ban phosphates in cleaning products to protect waterways. Always check local guidelines before buying detergent.
Preparation Steps
- Inspect siding for cracks, gaps, loose panels.
- Seal or repair minor damage.
- Cover electrical outlets, lights, and exposed wiring with plastic sheeting.
- Move outdoor furniture and protect landscaping.
- Close windows and doors tightly.
Don’t rush these steps. Missing a damaged panel or open window can let gallons of water inside your walls in minutes. Also, move grills and decorations away—they can block your path or get damaged by spray.
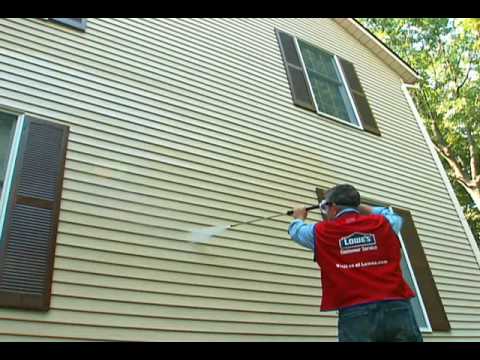
Credit: www.youtube.com
Step-by-step Power Washing Process
This section provides numbered steps with technical instructions, measurements, spacing, and common mistakes to avoid.
1. Set Up Pressure Washer
- Connect garden hose to pressure washer inlet.
- Attach the 25- or 40-degree nozzle tip.
- Add cleaning solution as per manufacturer instructions.
- Adjust pressure to 1,500–2,000 PSI.
Why: Too much pressure can crack or dislodge vinyl siding. Too little pressure won’t remove dirt.
Choose the right cleaning solution for your siding and follow dilution instructions carefully. Too much soap can leave residue that attracts more dirt. Never use hot water—vinyl can warp with heat.
2. Test In An Inconspicuous Area
- Spray a small area at the bottom of the siding.
- Check for damage, etching, or water intrusion.
- Wait 10 minutes and inspect.
Mistake: Skipping this step may cause widespread damage.
This test also helps you check if your cleaning solution is too strong. If the color fades or you see chalky residue, dilute the cleaner more.
3. Apply Cleaning Solution
- Start at the bottom and work upward.
- Hold wand at a 45-degree angle to prevent water from going behind siding.
- Spray 12–18 inches away from surface.
- Let solution sit for 5–10 minutes.
Why: Allows cleaner to break down dirt and mold.
Working bottom-up helps avoid streaks and lets the solution cling longer. Don’t let the detergent dry on the siding—work in sections if needed, especially on warm, sunny days.
4. Scrub Stubborn Spots
- Use a soft brush for areas with mold, algae, or stains.
- Gently scrub to avoid scratching.
Mistake: Using a wire brush damages vinyl finish.
Soft brushes remove grime without leaving marks. For high-up spots, use an extension pole. If algae is persistent, apply a bit more cleaner and wait before rinsing.
5. Rinse Siding
- Start at the top and work downward.
- Keep wand at a 45-degree angle and 12–18 inches from siding.
- Use steady, overlapping strokes.
Why: Prevents streaking and ensures complete rinse.
Overlap each pass by a few inches, like mowing a lawn, to avoid missed spots. Rinsing top-down carries dirt away and prevents dirty water from dripping onto clean areas.
6. Check For Water Intrusion
- After washing, inspect inside walls for moisture.
- Look for dampness, peeling paint, or mold growth.
Mistake: Power washing with faulty moisture barrier increases risk of hidden water damage.
If you notice musty smells or soft drywall indoors, investigate further. It’s easier to fix a minor leak now than wait for mold problems.
Technical Explanation: Vinyl Siding Entities
Understanding the core components of vinyl siding helps you avoid mistakes and maintain integrity.
Starter Strip
- The starter strip is installed at the base of the wall.
- Ensures first row of siding is straight and secure.
If this strip is loose, the entire row above may shift, letting water in. Check for visible gaps at the lowest panel.
J-channel
- J-channels frame windows, doors, and corners.
- Direct water away from joints and seams.
Dirt and debris often collect in J-channels. Take a moment to clear them by hand before washing to improve drainage.
Nailing Hem
- The nailing hem is the top edge of each siding panel.
- Fasteners go here, allowing panels to move with temperature changes.
If nails are too tight, panels can buckle in hot weather. If they’re too loose, panels rattle or come off during storms.
Expansion Gap
- Leave a 1/4 inch gap between siding panels and trim.
- Vinyl expands/contracts with heat and cold.
Gaps smaller than 1/4 inch can cause siding to warp or crack during temperature swings. If you hear popping sounds on sunny days, check your expansion gaps.
Fasteners
- Use galvanized nails or screws with a wide head.
- Do not fasten too tightly; siding must “float.”
Corroded fasteners can stain siding and loosen panels. If you see rust streaks, consider replacing with stainless or coated fasteners.
Moisture Barrier
- The moisture barrier sits behind the siding.
- Prevents water from reaching the sheathing and insulation.
If you ever remove a panel, check that the barrier is flat and undamaged. Any rip or puncture should be taped or replaced.
Building Envelope
- The building envelope includes siding, sheathing, house wrap, flashing, and insulation.
- Designed to keep out water, air, and pests.
Proper maintenance means checking all parts—not just the vinyl—every year or after big storms.
Common Mistakes
- Spraying water directly into gaps or seams
- Using too much pressure
- Power washing damaged siding
- Not checking for water intrusion after cleaning
These errors are easy to avoid with patience and careful inspection.
Troubleshooting: Issues & Solutions
Even with careful work, problems can happen. Here’s how to solve them:
- Siding comes loose: Inspect nailing hem and fasteners. Re-secure panels, ensuring proper expansion gap.
- Water behind siding: Check for missing or damaged house wrap and flashing. Repair as needed.
- Streaks or spots after washing: Rinse more thoroughly. Use a soft brush on stubborn areas.
- Mold returns quickly: Check moisture barrier and building envelope for leaks.
- Cracked panels: Replace damaged panels. Avoid high-pressure settings.
Some issues, like recurring mold, often signal a deeper problem with insulation or drainage. If you can’t solve these with cleaning, consider a professional inspection.
Cost Breakdown
Cleaning vinyl siding is cost-effective, but budgeting helps. Here’s an average cost analysis for a standard 2,000 sq. Ft. home.
| Item | Estimated Cost | Notes |
|---|---|---|
| Pressure washer rental | $40–$80/day | Electric preferred |
| Cleaning solution | $20–$30 | 1–2 gallons |
| Plastic sheeting/tape | $10–$15 | For protection |
| Safety gear | $15–$25 | Reusable |
| Professional cleaning | $200–$400 | Labor included |
DIY cost: $85–$150
Professional cost: $200–$400
Additional Cost Factors
- Repairs: Damaged panels ($10–$25 per panel)
- Water usage: 150–250 gallons per session
If you need to buy a pressure washer, entry-level models start around $130, but these are less powerful than rentals. Investing in your own equipment makes sense if you plan to clean yearly or have other uses, like washing decks or driveways.

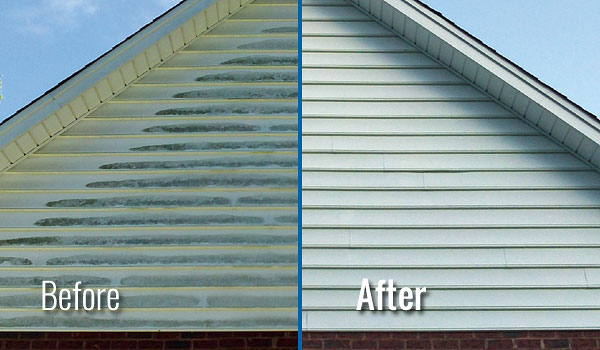
Credit: powerwashingman.com
Maintenance Tips For Vinyl Siding
Keep your siding looking good and functioning well with these tips:
- Clean every 12–18 months to prevent mold buildup.
- Inspect after heavy storms for cracks, gaps, or loose panels.
- Maintain expansion gaps and avoid painting vinyl.
- Replace damaged panels immediately.
- Use only siding-safe cleaning solutions.
A garden hose and brush are fine for touch-ups between deep cleans. Don’t use abrasive cleaners or pads, which can make the surface chalky and attract dirt faster. For shaded or north-facing walls, check more often for mildew.
Quick Maintenance Comparison
| Frequency | Task | Estimated Time |
|---|---|---|
| Monthly | Visual inspection | 10–15 minutes |
| Annually | Full cleaning | 2–3 hours |
| As needed | Panel replacement | 30–60 minutes |
Regular care means fewer repairs and longer-lasting siding. If you see insects getting behind panels, seal gaps right away to avoid pest problems.
Frequently Asked Questions
How Often Should I Power Wash Vinyl Siding?
Clean vinyl siding every 12–18 months. If you live in a humid area or near trees, clean more often. Regular washing prevents mold and keeps colors bright.
What Psi Is Safe For Vinyl Siding?
Keep pressure between 1,500–2,000 PSI. Higher pressure risks cracking or dislodging panels. Always test on a small section first.
Can I Use Bleach To Clean Vinyl Siding?
Avoid bleach. It can damage siding and harm landscaping. Use oxygenated cleaners or solutions marked safe for vinyl siding. For more details on safe cleaners, see EPA Safer Choice.
What Should I Do If Water Gets Behind The Siding?
Stop washing immediately. Inspect for gaps in house wrap or flashing. Dry out affected areas and repair any damage. Persistent moisture can lead to mold and rot.
Is Power Washing From A Ladder Safe?
No. Never power wash from a ladder. The force can cause loss of balance. Use an extension wand or hire a professional for tall homes.
How Do I Prevent Streaks Or Spotting?
Always rinse from top to bottom with overlapping strokes. Let cleaning solution sit for 5–10 minutes, but don’t let it dry completely. If streaks remain, rinse again and use a soft brush.
—
Power washing vinyl siding is simple when you understand the technical details and follow each step carefully. You now have a complete guide—from tools to troubleshooting—to safely clean and maintain your home. If you handle preparation and maintenance, you’ll protect your building envelope and keep your property looking its best for years. With a little extra care, you’ll avoid costly mistakes and enjoy a cleaner, healthier home exterior.
Credit: wiseguysprowash.com