

Apply cedar siding by measuring, prepping, installing boards, and sealing edges for lasting protection.
I have installed cedar siding on homes and cabins for over a decade, and this guide walks you through how to apply cedar siding step by step. You'll get clear, practical instructions, tool lists, and troubleshooting tips to help you avoid common mistakes and finish a strong, weatherproof job. Read on and learn proven methods for how to apply cedar siding the right way, from prep to finish.

Materials and Tools You Need
Start with good materials and the right tools to make the job smooth. You will need cedar siding boards, starter strips, nails or screws rated for exterior use, a level, chalk line, tape measure, saw, pry bar, and a caulk gun. Also get flashing, house wrap, trim boards, and wood preservative or stain. Having the right gear reduces waste and speeds work when you apply cedar siding.
Preparing the Wall and Wood
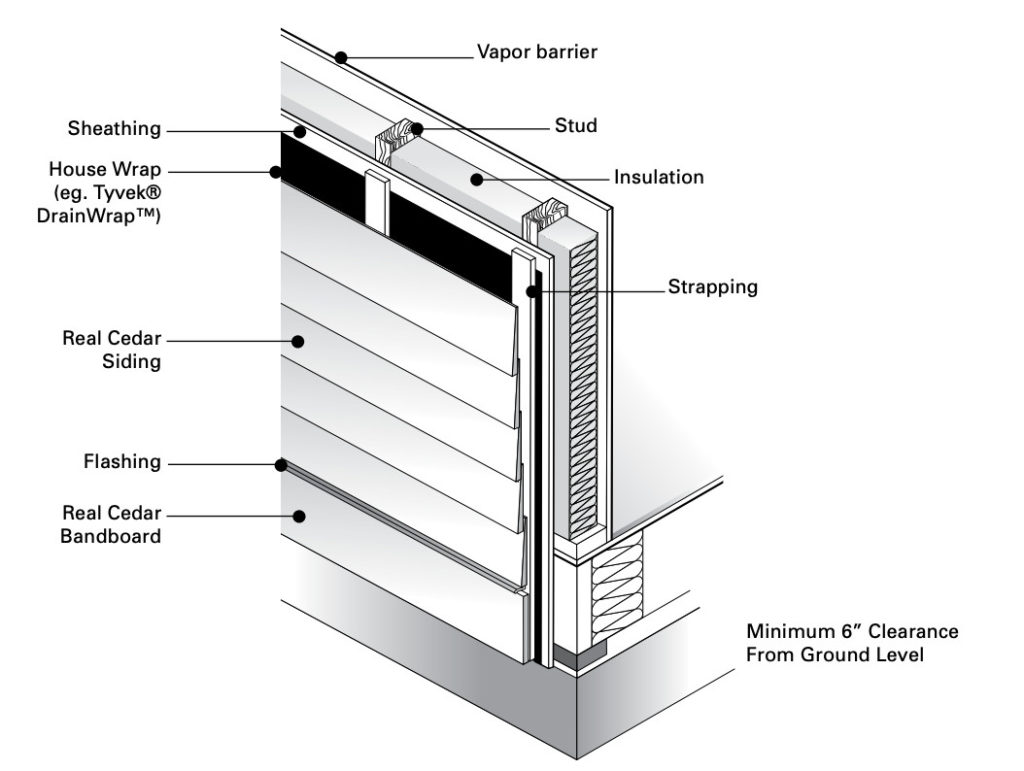
Preparation protects the house and the wood. Remove old siding and check the sheathing for rot or mold. Install house wrap and flashing around openings to prevent water intrusion. Let the cedar acclimate for a day or two on site before you apply cedar siding so it settles to local humidity.
Choosing Cedar Siding Types and Grades
Cedar siding comes in many styles and grades. Choose between clapboard, shiplap, tongue-and-groove, and board-and-batten. Select a grade based on budget and appearance: clear grade for fewer knots and knotty grade for rustic charm. The style and grade affect cost, trimming, and how you apply cedar siding.

Measuring and Laying Out
Accurate layout saves time and gives a clean finish. Measure wall height and divide by board width to find the best layout that minimizes narrow pieces. Snap a chalk line for each course and use a level to keep lines straight. Mark studs and corners so you know where to fasten when you apply cedar siding.

Step-by-Step: How to Apply Cedar Siding
Follow these steps to install cedar siding safely and correctly.
- Install starter strip or flashing
- Fasten a solid starter strip at the bottom to support the first row. Check for level across the whole wall.
- Start at the bottom and work up
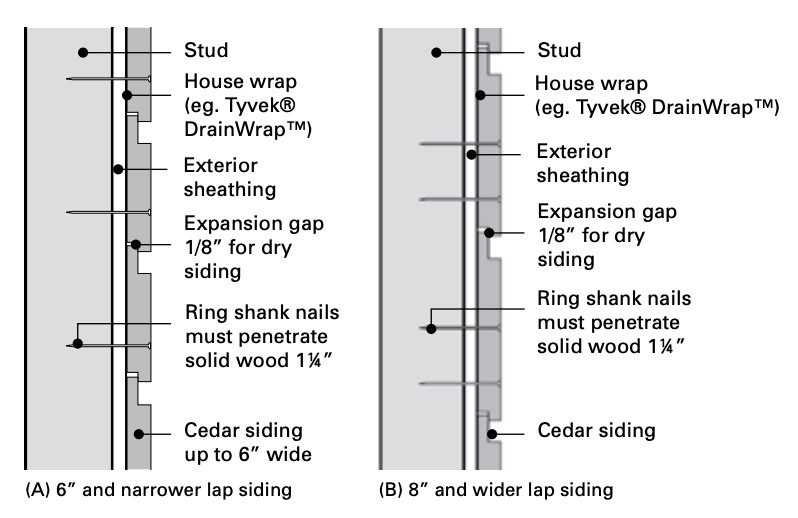
- Place the first board on the starter strip. Leave a small gap at the top and bottom for expansion when you apply cedar siding.
- Fasten correctly
- Use corrosion-resistant nails or screws. Drive fasteners into studs and leave heads slightly proud to allow movement.
- Stagger joints
- Offset vertical joints by at least 6 feet between courses. This keeps water out and looks better.
- Cut around openings
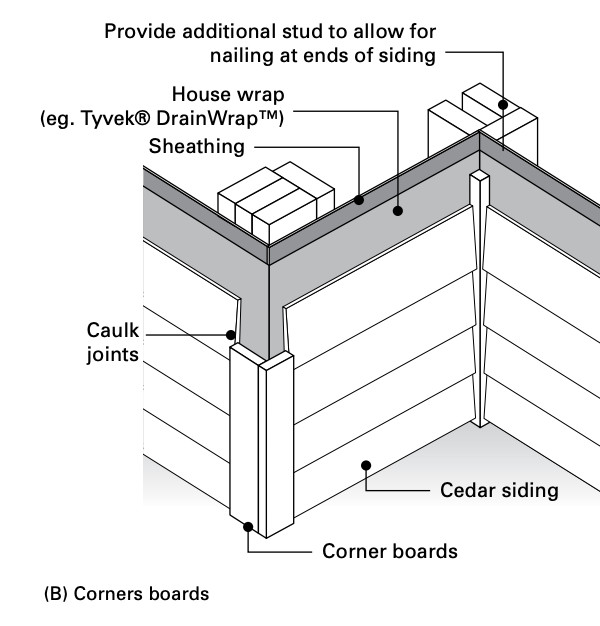
- Fit boards at windows and doors and install drip flashing. Use trim boards to cover gaps near openings.
- Maintain control joints
- Include expansion joints for long runs. Space control joints per manufacturer recommendations when you apply cedar siding.
These steps form the backbone of how to apply cedar siding and help prevent warping and water damage.

Fastening and Nailing Best Practices
Fastening makes or breaks the install. Use hot-dip galvanized or stainless steel nails or screws to prevent rust. Nail into studs and keep nails straight. Avoid overdriving, which can split the wood. When you apply cedar siding, allow for 1/8-inch to 3/16-inch gaps at butt joints for movement.
Finishing: Trim, Stain, and Seal
Finish work protects the wood and completes the look. Install trim around corners, windows, and doors. Apply a wood preservative or primer before staining if you plan to paint or stain. Use quality exterior stain or paint and seal cut ends to slow moisture ingress. Good finishing is a key part of how to apply cedar siding that lasts.

Maintenance and Care
Regular maintenance keeps cedar siding looking good and working well. Inspect siding yearly for loose boards, peeled finish, or rot. Clean with mild detergent and a soft brush. Re-stain every 3–7 years depending on climate and finish. Proper care extends life and reduces repair needs after you apply cedar siding.
Common Mistakes and Troubleshooting
Avoid these common errors when you apply cedar siding.
- Not allowing wood to acclimate
- This leads to warping and twisting.
- Using wrong fasteners
- Cheap nails will rust and stain the wood.
- Skipping flashing and house wrap
- Water gets behind the siding and causes rot.
- Overcutting or tight joints
- Tight joints trap moisture and prevent movement.
- Ignoring grain direction
- Boards cupped toward sun or rain wear faster.
If you see buckling or staining, remove affected boards, check sheathing, and replace with sealed and flashed pieces.
Costs, Time, and Planning
Plan budget and schedule carefully. Material cost varies by cedar grade and profile. Labor time depends on wall size and crew experience; a small house can take a few days to a week. Factor in time for prep, cutting, and drying. Good planning makes how to apply cedar siding efficient and predictable.
Benefits and Limitations of Cedar Siding
Cedar has many perks but also limits. Benefits include natural beauty, good insulation, and rot resistance. Cedar is lightweight and easy to work with, which helps when you apply cedar siding yourself. Limitations include higher cost than vinyl, need for periodic staining, and susceptibility to insect or moisture damage if not maintained.
My Experience and Lessons Learned
I once worked on a 100-year-old cottage and learned fast. We pre-cut boards and labeled them by row. That saved hours during install. I also learned to seal all cut edges before nailing. That step prevented early checks and rot. My best tip: plan layout for the longest, cleanest boards first. That approach improved the final look when I apply cedar siding.
Local Regulations and Environmental Considerations
Check local rules before you apply cedar siding. Some areas limit certain treatments or wood types. Consider sustainably sourced cedar or alternative wood options if needed. Proper disposal of old siding and eco-friendly finishes reduce environmental impact.
PAA-Style Quick Questions and Answers
What is the best time of year to install cedar siding?
- Spring and fall offer mild temperatures and moderate humidity. Extreme heat or cold can make wood move and complicate installation.
How wide should gaps be between cedar boards?
- Leave 1/8-inch to 3/16-inch at butt joints for expansion. Larger gaps may be needed in high-humidity regions.
Do I need a pro to install cedar siding?
- DIY is possible with tools and patience, but hire a pro for complex roofs, steep walls, or historic homes. Pros reduce risk of water damage.
How long does cedar siding last?
- Properly installed and maintained cedar can last 30 to 50 years. Regular staining and inspections extend life.
Can I paint cedar siding instead of staining?
- Yes, painting adds a protective layer and changes look. Stain lets the grain show and requires more frequent upkeep.
Frequently Asked Questions of how to apply cedar siding
How long does it take to apply cedar siding on a small house?
A small house can take a few days to a week, depending on prep and weather. Skilled crews work faster than DIY teams.
What fasteners should I use when I apply cedar siding?
Use stainless steel or hot-dip galvanized nails or screws rated for exterior use. These resist rust and staining over time.
Should I paint or stain cedar siding after installation?
Stain keeps the natural grain and needs reapplication every few years. Paint gives longer color life but hides the wood grain.
How do I prevent cedar siding from warping?
Allow boards to acclimate, leave proper gaps, and seal cut ends. Good fastening and flashing also reduce warping risk.
Can I install cedar siding over existing siding?
It is possible if framing and sheathing are sound and building codes allow it. Removing old siding is often better to inspect for damage.
Conclusion
You now have a clear, step-by-step roadmap for how to apply cedar siding—from tools and prep to finishing and care. Start with careful planning, use the right fasteners and flashing, and allow the wood to move. If you take one action today, measure and plan the layout; it saves time and gives a cleaner result. Try a small test wall if you are new, and share your results or questions below to keep learning.