
Prep the wall, flash well, level your starter, then nail cedar with gaps.
If you want a long‑lasting, beautiful exterior, learning how to hang cedar siding the right way matters. I have installed cedar on new builds and tricky remodels, through rain seasons and heat waves. In this guide, I show you how to hang cedar siding with clean lines, tight weatherproofing, and zero guesswork. Follow along and you will avoid rot, cupping, and call-backs.

Tools and materials checklist
Get your tools in order before you start. This keeps the pace steady and the results clean.
- Circular saw with a fine-tooth blade for wood
- Jigsaw for notches
- Level, laser, and chalk line
- Tape measure and story pole
- Pneumatic coil nailer or hammer
- Stainless steel ring-shank siding nails
- Drill and countersink bit for predrilling near ends
- Stapler or cap nailer for WRB and flashing
- Utility knife and shears for housewrap and flashing tape
- Ladder, pump jacks, or scaffolding
- Safety glasses, gloves, hearing protection, dust mask
Materials to have on site:
- Cedar siding profile of choice
- Housewrap or other code-approved weather-resistive barrier
- Flashing tape and metal flashings
- Furring strips for rainscreen
- Corrosion-resistant bug screen for vented gaps
- Primer or stain and end-grain sealer
- Color-matched, paintable, high-quality sealant
Tip from the field: I lay out fasteners, spacers, and blocks in small bins on the staging. This avoids trips down the ladder and speeds up how to hang cedar siding.
Choosing the right cedar and profile
Pick cedar that fits your climate, style, and budget. Western red cedar is common and stable. White cedar weathers lighter and is also great. Look for vertical grain for top stability, especially in harsh climates. Moisture content should be near what your site has, often 12 to 15 percent.
Popular profiles:
- Bevel or clapboard for classic horizontal lines
- Channel rustic for shadow lines and some movement tolerance
- Tongue and groove for either horizontal or vertical, often blind-nailed
- Shingles or shakes for rich texture and curved walls
- Board and batten for a clean vertical look
Factory-primed or prefinished stock saves time and makes how to hang cedar siding easier. I prefer prefinished on tight timelines, as it seals all faces and trims offsite.

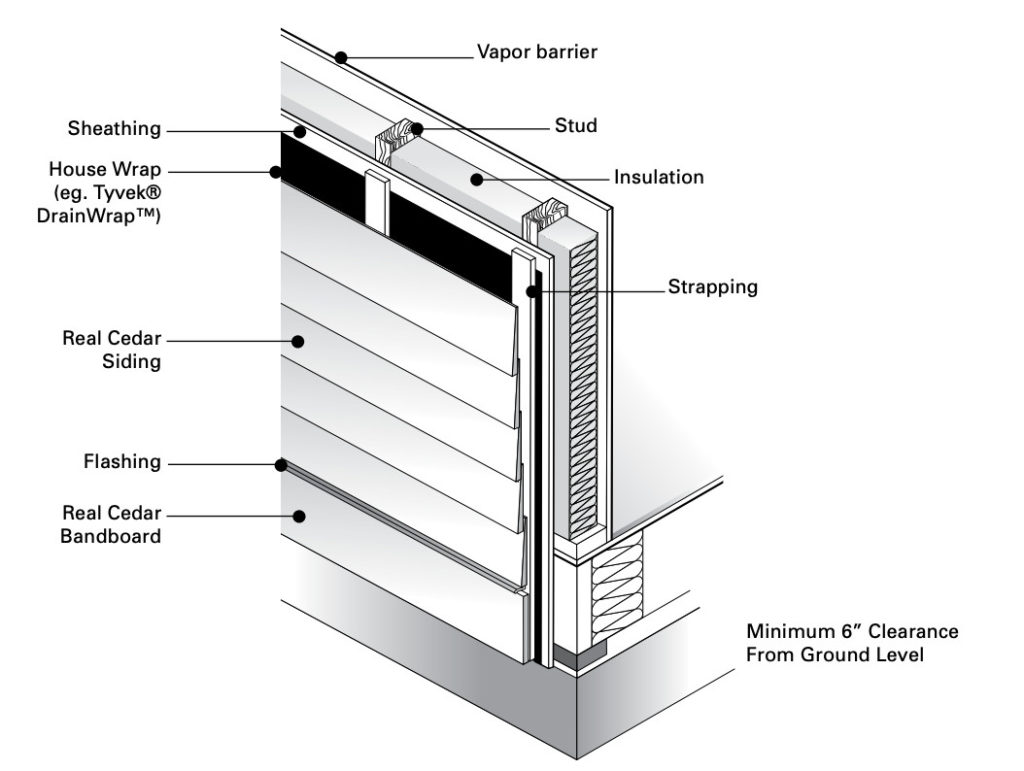
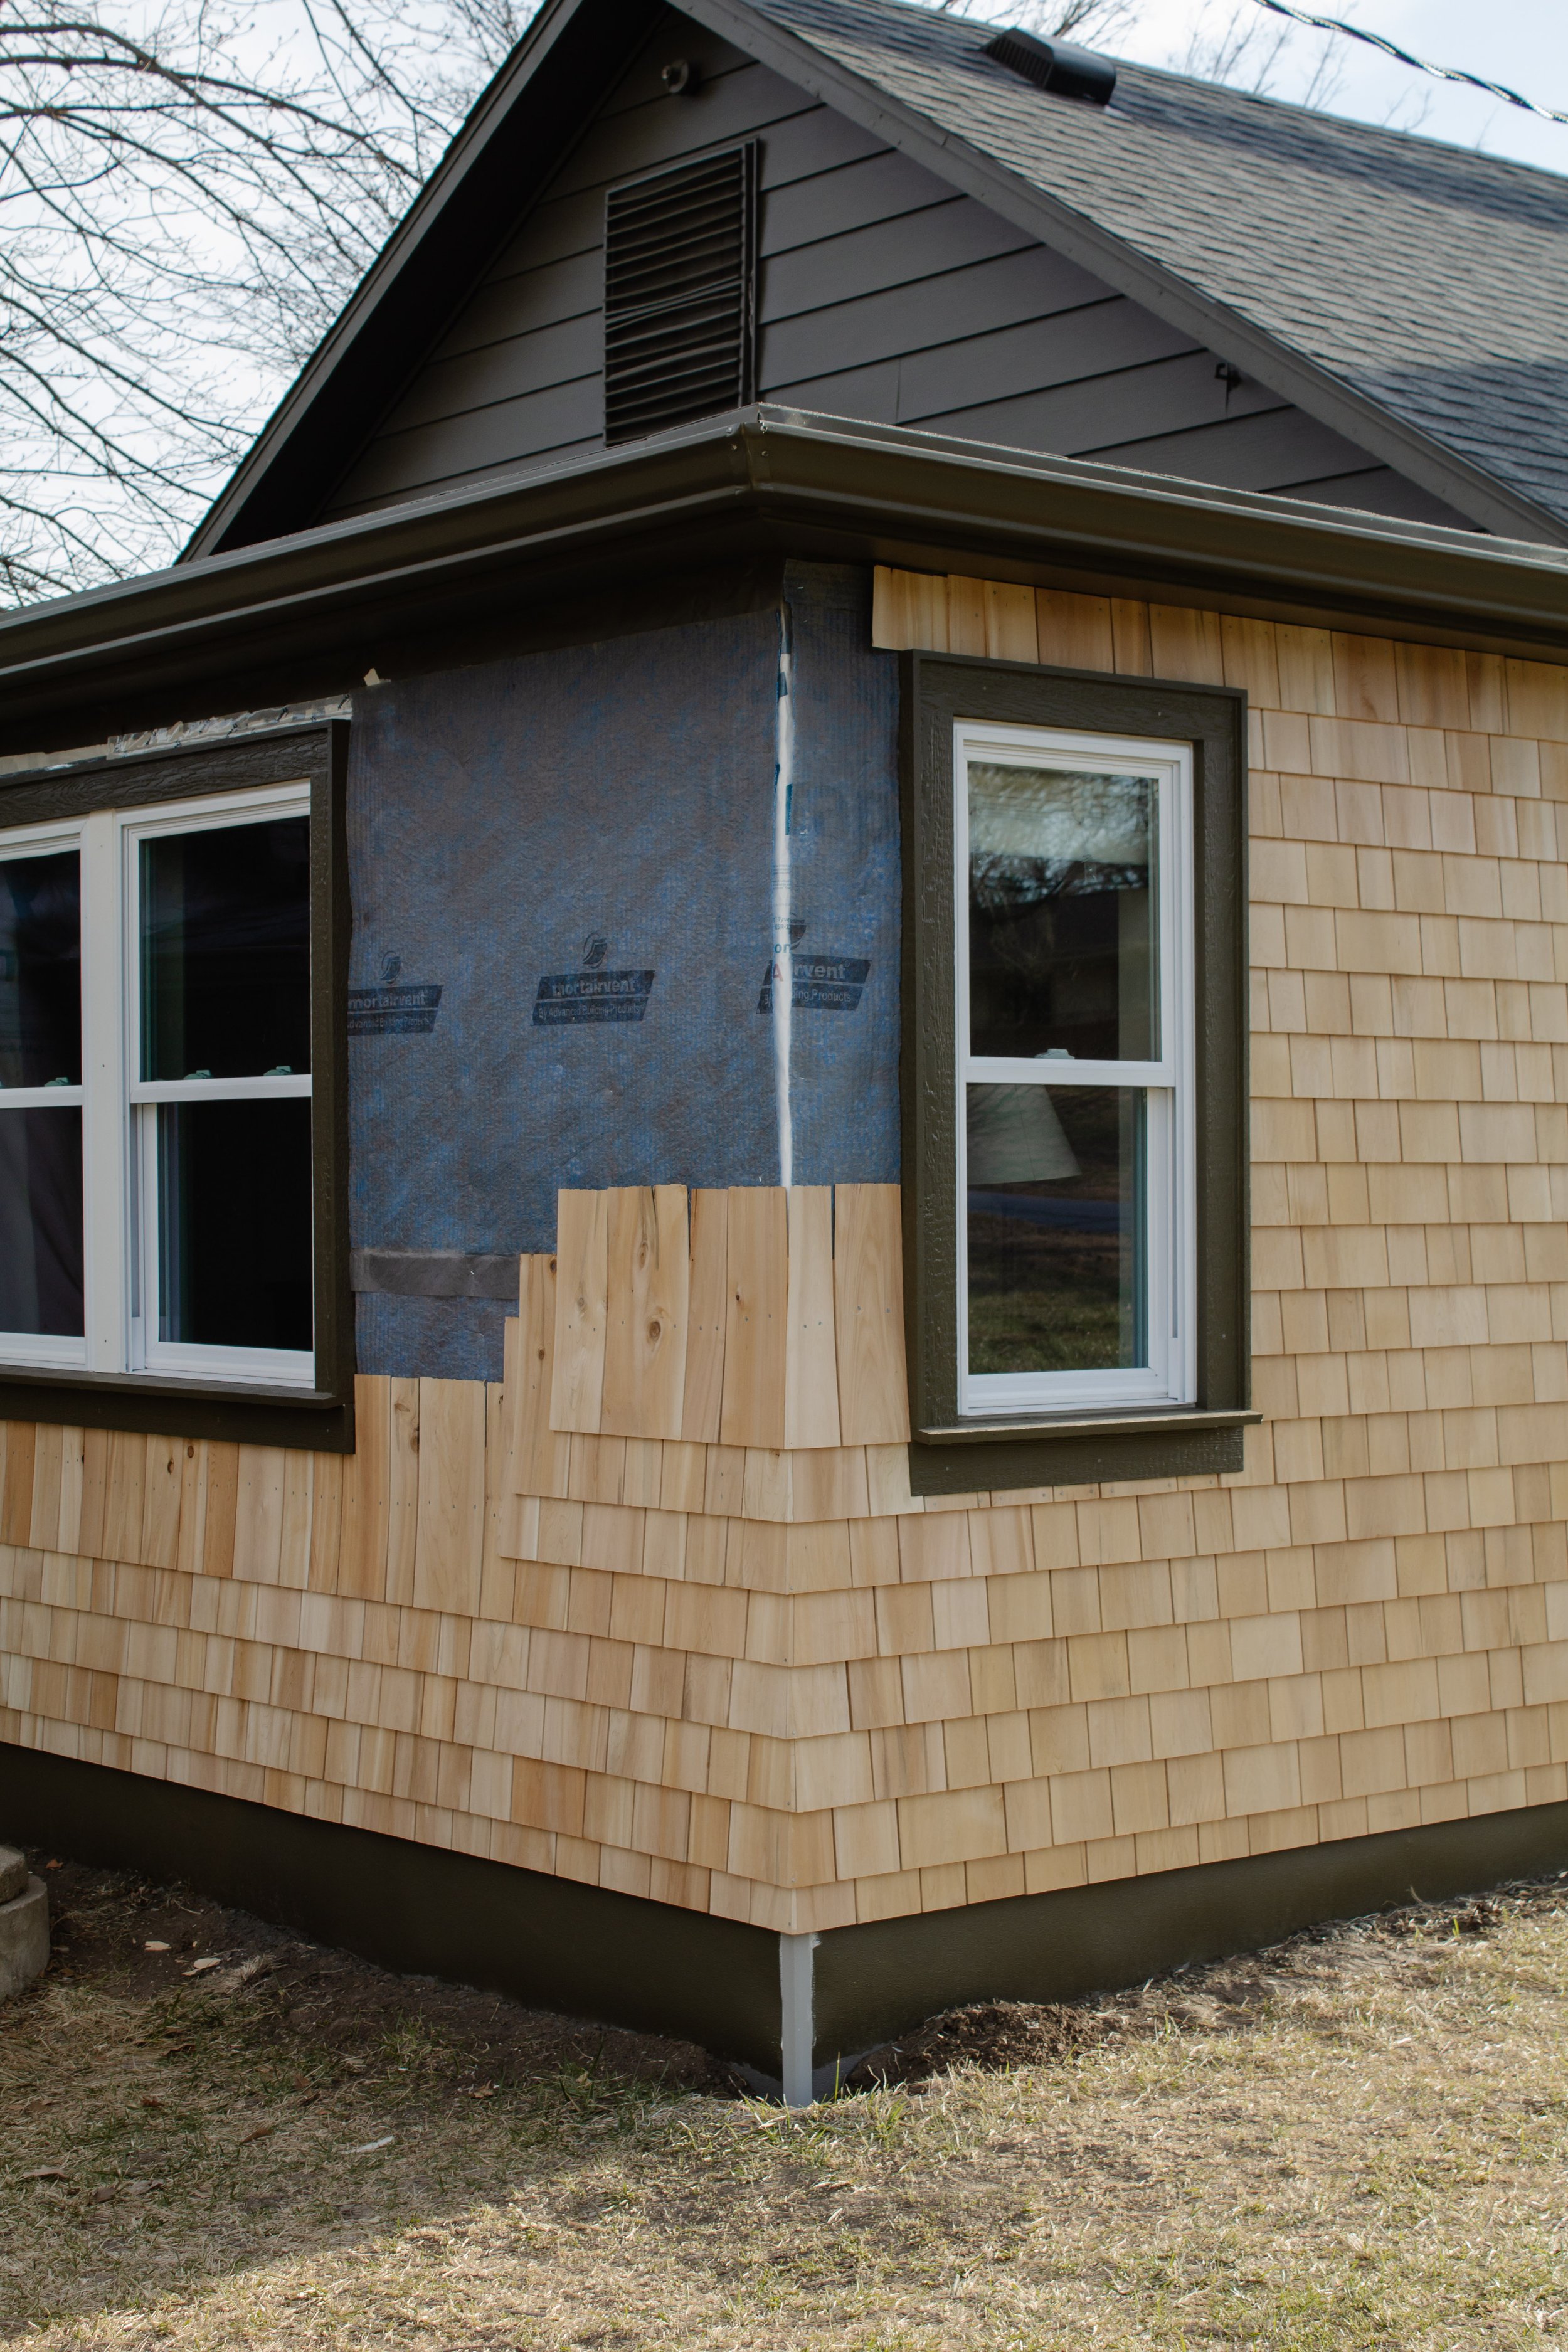
Prep the wall: weather barrier, flashing, and furring
Water control is the heart of how to hang cedar siding that lasts. Start watertight, then add pretty.
- Install a continuous weather-resistive barrier over sheathing. Lap it shingle style so water sheds down.
- Flash all openings. Use adhesive flashing tape at sills first, then jambs, then heads. Cap with metal drip caps over windows and doors.
- Add kick-out flashings where roofs meet walls.
- Use a vented rainscreen when you can. Fasten vertical furring strips over studs. Leave a bottom and top vent with bug screen. This gap lets cedar dry fast and stay flat.
- At concrete or paved areas, use a weep screed or leave a clear gap so wood never sits in splashback.
On tight remodels, I have fixed rot that started with a missed head flashing. Do not rush this step. It is the backbone of how to hang cedar siding well.

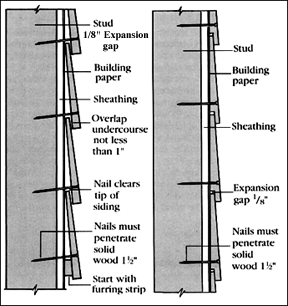
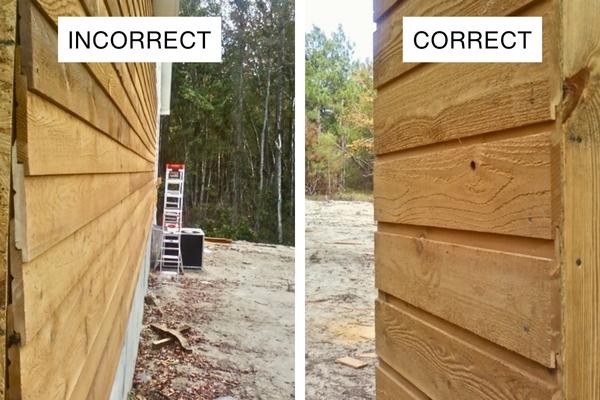
Planning layout, starter strip, and expansion gaps
Good layout makes the final look sharp and saves time.
- Snap a level line for your starter course. Use a beveled starter strip to kick out the first board so the laps sit flat.
- Keep clearance above grade, roofs, and hardscapes. Aim for at least 6 to 8 inches above soil, 1 to 2 inches above shingles, and 1 inch above decks or walks.
- Build a story pole. Mark course heights so you can align around corners and over windows.
- Stagger butt joints on adjacent courses by at least two studs. Use joint flashing behind every butt joint.
- Leave small gaps for wood movement. For most bevel siding, a paper-thin gap at butt joints works when joint-flashed. For tongue and groove, follow the maker’s gap guidance.
Quick PAA-style answers about layout:
- How many nails per board for horizontal bevel? One per stud, through the thick part, never through the thin lap.
- Can I start mid-wall? Yes, if you reference a control line, but it is harder. Starting at the base with a true starter strip is best.
- Do I need to acclimate cedar? Yes. Store flat, shaded, and ventilated on site for a few days before you hang it.
These small checks cut errors in how to hang cedar siding and give crisp reveals at every corner.
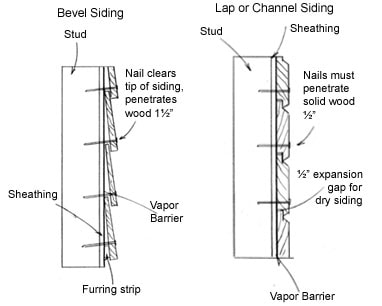
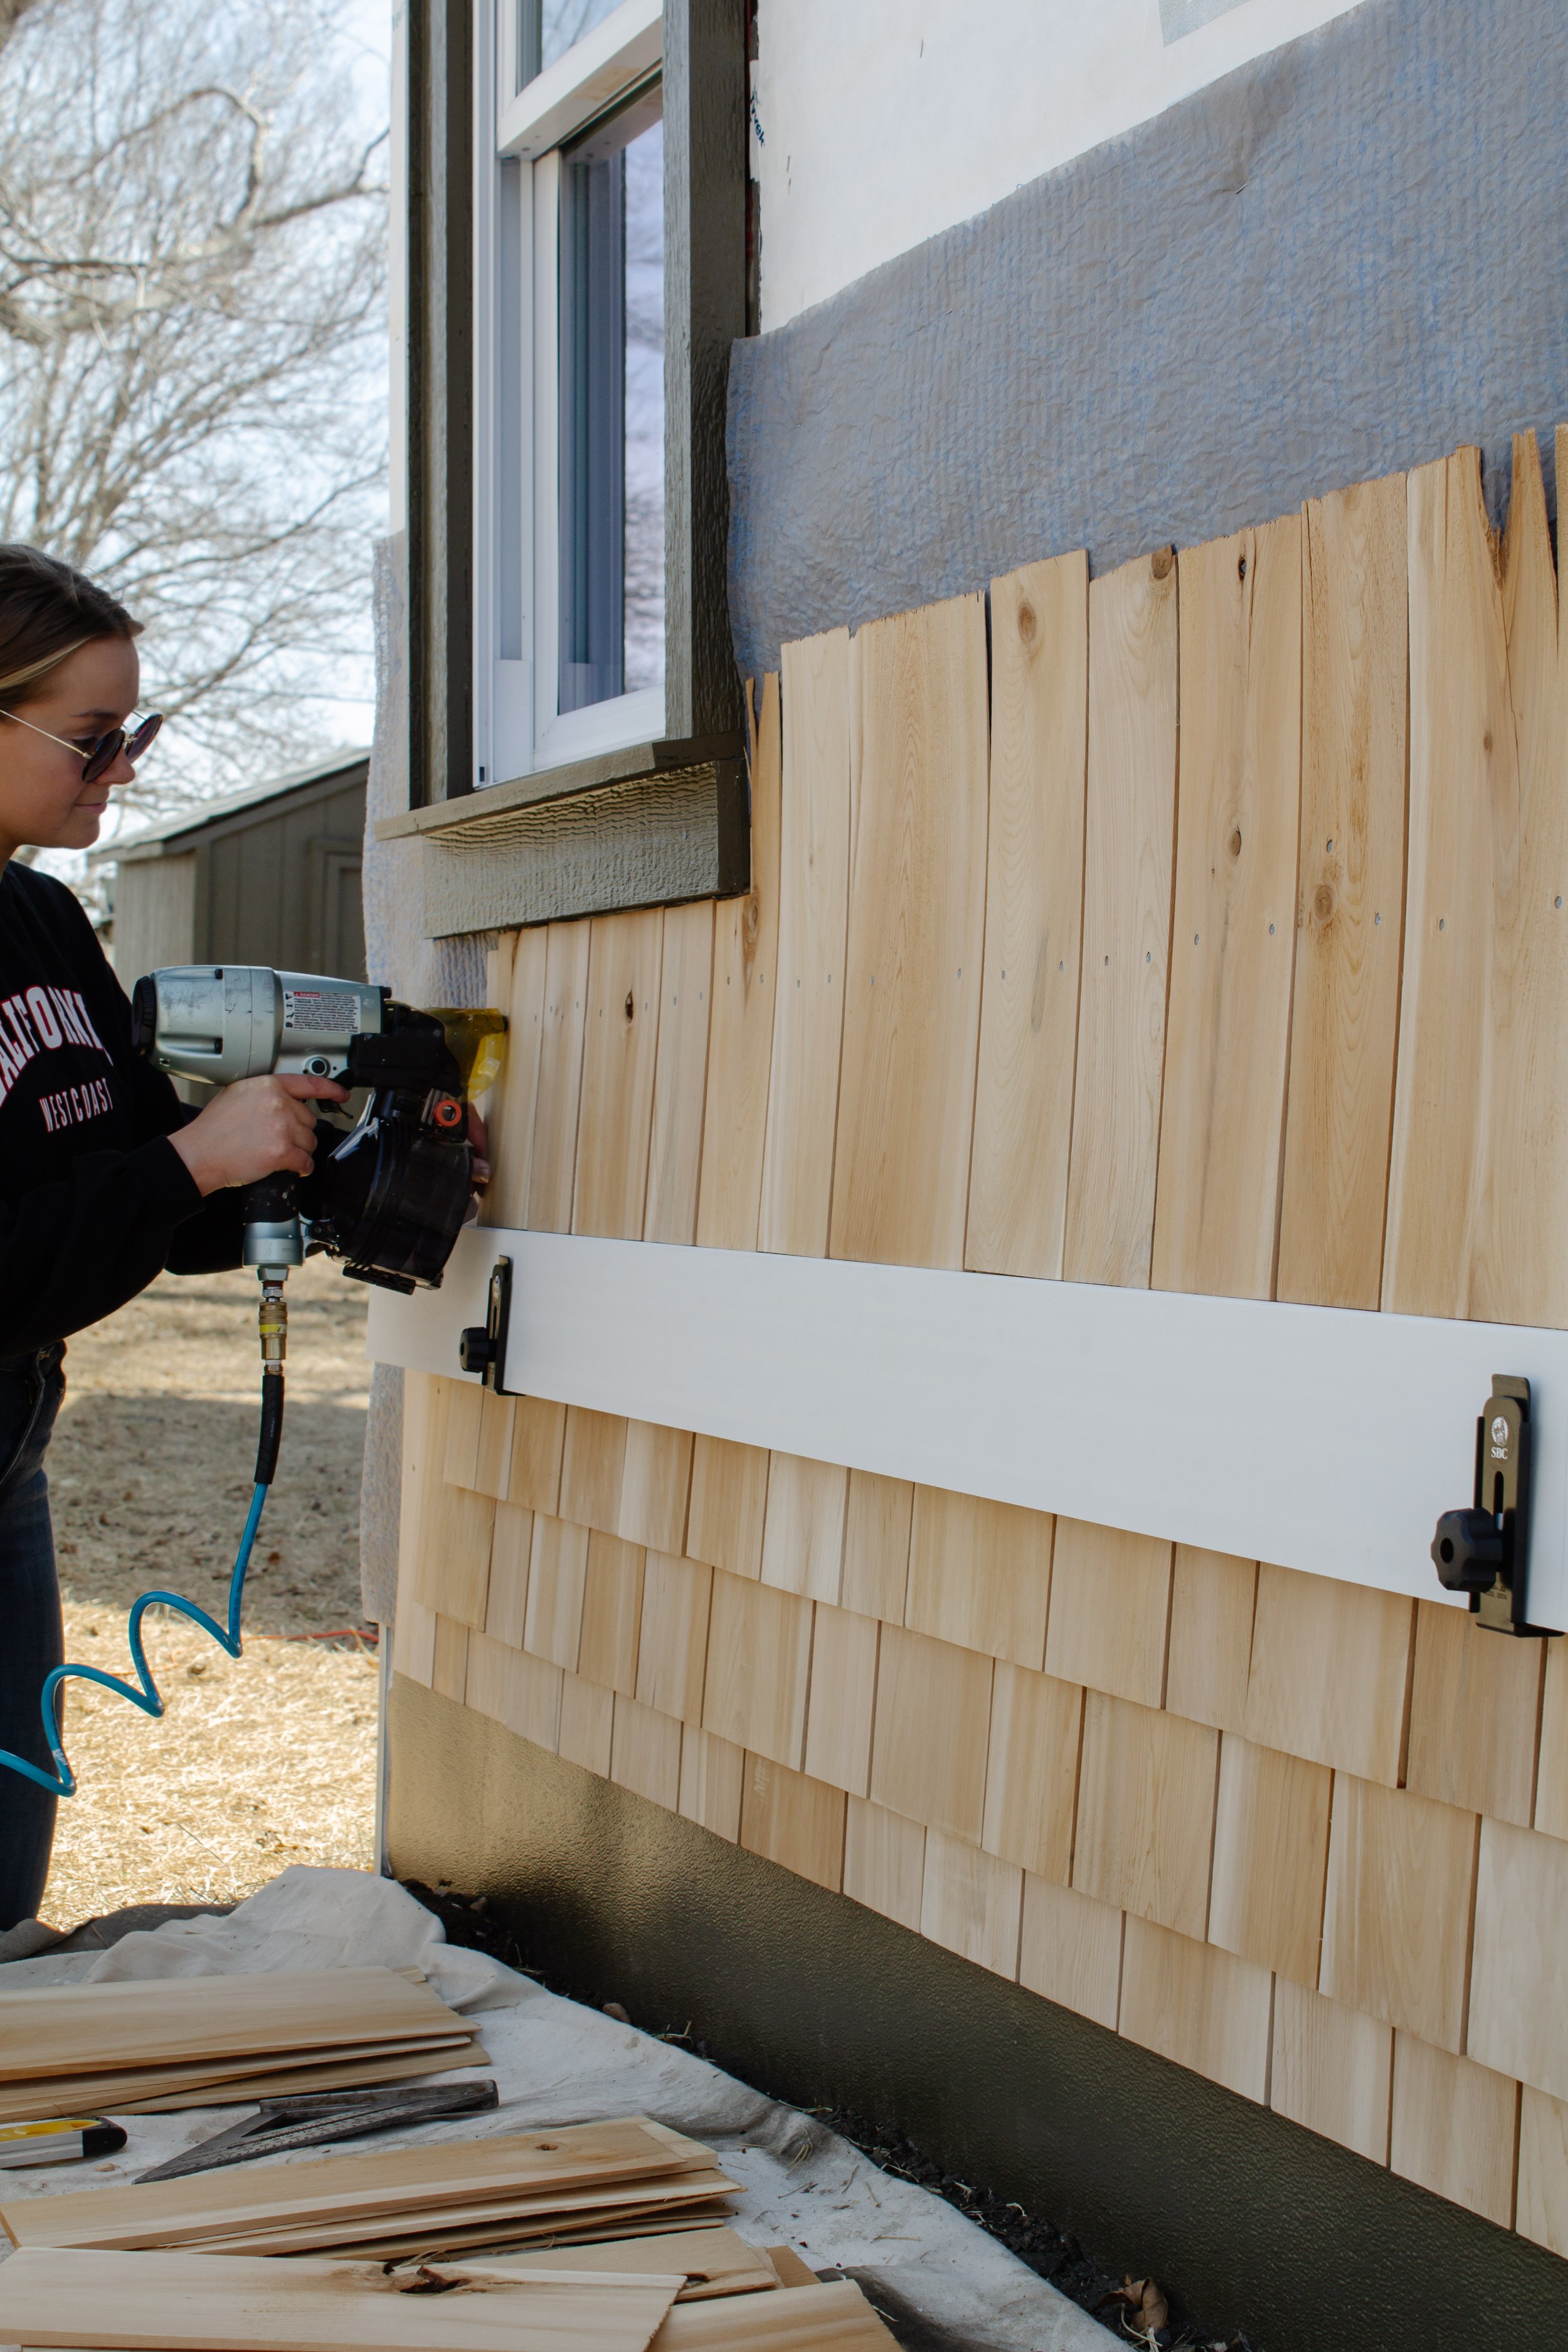
Fasteners, nailing patterns, and best practices
Nails matter. The wrong nail stains cedar and works loose.
- Use stainless steel nails. Type 304 is fine in many regions, Type 316 near salt air.
- Use ring-shank siding nails with small heads. Do not use roofing nails.
- Size nails so they penetrate studs by at least 1 inch after passing through siding and sheathing.
- For bevel siding, face-nail high on the thick edge. Do not nail through overlaps.
- For tongue and groove, blind-nail through the tongue where allowed, or face-nail near the tongue edge.
- Predrill near board ends to avoid splits, especially in cold weather.
- Keep nails flush, not sunk. Overdriven nails invite water and stains.
On one coastal job, the only copper nails we could get were short. We waited rather than risk short penetration. That patience kept the siding tight and shows the discipline needed for how to hang cedar siding right.
Step-by-step: how to hang cedar siding
Follow this simple path. Slow is smooth, smooth is fast.
Horizontal bevel lap
- Snap a level starter line and install a beveled starter strip along studs.
- Cut the first course to length. Back-prime and seal end grain.
- Set the board to the line. Nail into each stud at the thick edge.
- Overlap the next course to the reveal you planned. Check with a story pole.
- Stagger butt joints. Place joint flashing behind every joint.
- Work around windows. Tuck siding under head flashings and over sill pans.
- Check level every few courses. Small errors grow fast.
- Cap with trim and a drip cap at the top courses if needed.
Shingles
- Snap a starter line. Install a starter course with double thickness at the base.
- Lay shingles with correct exposure for their length and your climate.
- Leave a small gap between shingles. Nail about an inch above the exposure line, two nails per shingle.
- Stagger vertical joints by at least 1.5 inches between courses.
- Flash valleys, corners, and tops with step and cap flashings as you climb.
Board and batten (optional)
- Install vertical boards with a small gap between edges for movement.
- Cover gaps with battens centered over the seam.
- Nail boards through studs. Then nail battens through the gaps into studs.
As you master how to hang cedar siding, keep a rhythm. Cut, seal, set, nail, and check level. Clean sawdust so finish adheres later.
Finishing: sealing, caulking, and painting or staining
Finish is your armor. It also defines the look.
- Back-prime or back-seal all faces and edges before install when you can. Always seal end grain.
- For a painted look, use an alkyd primer and two top coats of quality exterior paint.
- For a natural look, use a penetrating oil or waterborne stain with UV blockers.
- Do not caulk horizontal laps. Do caulk at trim joints, vertical abutments, and penetrations.
- Keep a wet edge when brushing. Factory finishing makes how to hang cedar siding much faster and more consistent.
I prefer semi-transparent stain in sunny zones. It weathers with grace and is easy to refresh.

Maintenance, longevity, and troubleshooting
Cedar can last decades. It needs light care.
- Wash gently with water and mild soap every year or two.
- Recoat stain every 3 to 7 years, paint every 7 to 12, based on exposure.
- Check for loose nails, cupping, and open joints after storms.
- Treat iron stains with oxalic acid cleaner. Replace damaged boards early.
- Keep plants and sprinklers away from walls. Wet shade is the enemy.
These habits lock in the gains you made when you learned how to hang cedar siding.
Safety, codes, and environmental tips
Work safe and smart.
- Use fall protection on anything beyond a simple ladder reach.
- Wear eye, ear, and dust protection while cutting.
- Follow local codes for WRB, flashing, fire ratings, and wind loads.
- In fire-prone zones, consider fire-retardant-treated cedar and metal flashings with bigger laps.
- Buy certified, responsibly harvested cedar when possible.
Code rules on flashing and WRB overlap are strict for a reason. They are core to how to hang cedar siding to code and keep insurance happy.
Cost, time, and project planning
Plan the job so you finish strong.
- Budget for waste. Order 10 to 15 percent extra for cuts and sorting.
- Price stainless fasteners and finish early. These drive cost and quality.
- Schedule install in dry weather. Keep materials covered and flat.
- A small home can take a week or two with two people. Complex trim adds days.
- Build time for acclimation and finishing between coats.
A clear plan helps you predict how to hang cedar siding on time and on budget, even if weather shifts.
Frequently Asked Questions of how to hang cedar siding
What is the best nail for cedar siding?
Use stainless steel ring-shank siding nails. They resist rust and hold tight without staining the wood.
Should I install a rainscreen behind cedar?
Yes, a vented gap improves drying and extends life. It also reduces paint or stain failures.
How thick should the starter strip be?
Match the starter to the butt thickness of your bevel siding. This keeps the first course level and maintains even reveals.
Can I install cedar siding in winter?
Yes, but be careful. Predrill near ends to prevent splits and keep finish products within their temperature ranges.
Do I need to seal the end grain?
Always seal cut ends before installation. End grain drinks water and is the first place rot starts.
How long should I wait to stain new cedar?
If prefinished, you are done. If bare, stain as soon as the surface is dry and clean, often within a few days of install.
How do I handle outside corners?
Use solid corner boards or mitered corners with back flashing. Corner boards are more forgiving and better for wet climates.
What reveals work best for bevel siding?
Common reveals range from 4 to 6 inches. Choose a size that aligns cleanly with windows and doors using a story pole.
Conclusion
Now you know how to hang cedar siding from prep to final coat. Plan the layout, flash with care, use stainless fasteners, and seal the wood. Small, steady steps lead to a dry wall and a sharp look.
Pick a wall, gather tools, and set your starter line today. If this guide helped, subscribe for more pro how-tos, or leave a comment with your project details so I can help you plan the next steps.