
Attach cedar siding using a starter course, proper flashing, and stainless-steel nails spaced for ventilation.
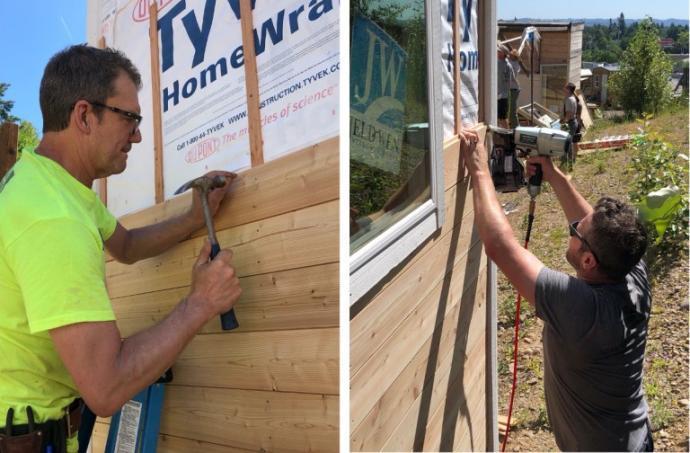
I have installed cedar siding on many homes. I will walk you through how to attach cedar siding step by step. This guide blends hands-on experience with building best practices. You will get clear instructions, common pitfalls, material choices, and maintenance tips. Read on to learn how to attach cedar siding the right way and avoid costly mistakes.

Why choose cedar and an overview of how to attach cedar siding
Cedar is light, durable, and resists rot and insects. It also looks warm and natural on a home. Knowing how to attach cedar siding helps a house stay dry and last for decades. Proper attachment protects the wood from moisture and wind. This section explains the benefits and basic concepts before you start.
- Natural decay resistance and good insulation value.
- Two main styles: shingles and clapboard (boards).
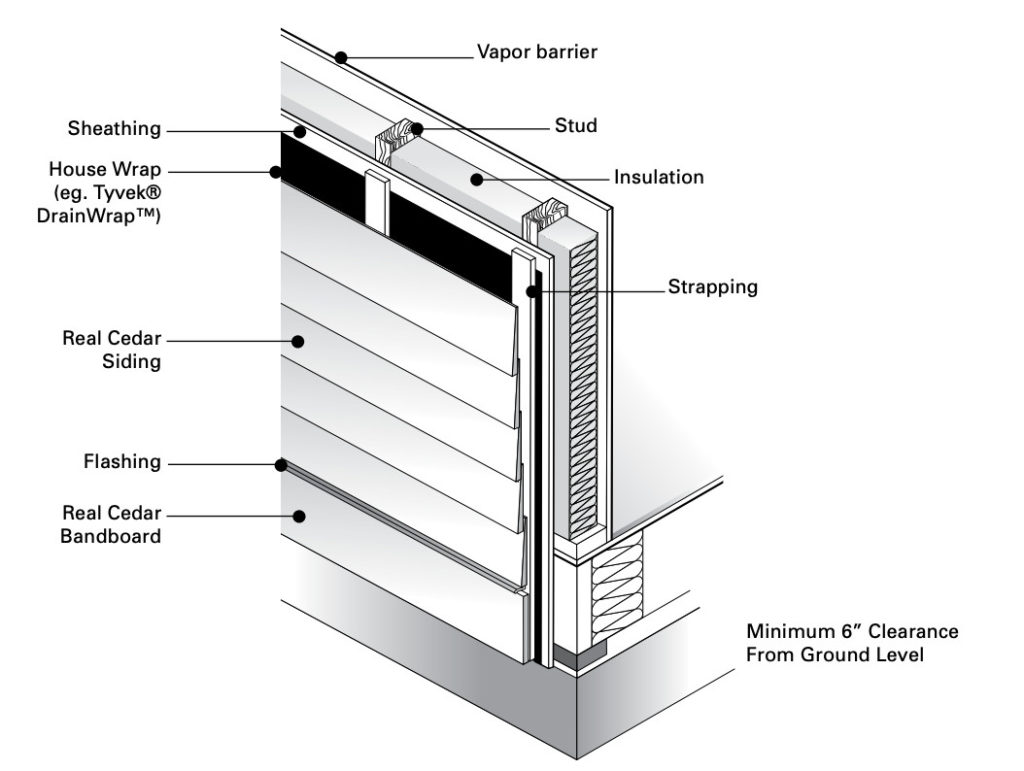
- Key concepts: ventilation, flashing, furring, and correct fasteners.
Tools and materials you will need to attach cedar siding
Use the right tools. They make the job safe and fast. Below is a compact list you can use as a checklist.
- Tools
- Circular saw or miter saw for cutting cedar.
- Jigsaw for curved cuts.
- Pneumatic or hand-driven siding nailer.
- Chalk line, level, tape measure, and square.
- Hammer, pry bar, and utility knife.
- Caulking gun and paint brushes.
- Materials
- Cedar boards or shingles (kiln-dried recommended).
- Stainless-steel or hot-dipped galvanized nails.
- House wrap or felt paper for weather barrier.
- Flashing for windows, doors, and transitions.
- Furring strips if needed for drainage gap.
- Starter strips, corner trim, and drip edge.
- Clear or pigmented stain or paint and wood preservative.

Preparing the wall before you attach cedar siding
A good start prevents future problems. Prepare the wall in clear steps.
- Inspect and repair the sheathing. Replace rotten or soft areas.
- Install or repair house wrap. Overlap seams and tape them.
- Add flashing at sills, windows, and doors. Flashing directs water out.
- Install furring strips when needed. They create a drainage and air gap.
- Mark a level line for the starter course. Use a chalk line.
Always follow local building code requirements when you prepare walls. Proper prep makes attaching cedar siding faster and safer.
Step-by-step: how to attach cedar siding
This is the core of the guide. Follow each step carefully. I include nail spacing, overlaps, and ventilation tips.
-
Plan your layout
- Measure the wall height and mark lines for courses.
- Stagger joints between boards to avoid a weak seam line.
- Calculate material needs and buy 10–15% extra for waste.
-
Install the starter course
- Snap a level chalk line at the bottom of the wall.
- Attach a starter strip or a full-width board to set the first row.
- Ensure the starter is straight. This controls the whole wall.
-
Fastening method and nail type
- Use stainless-steel or hot-dipped galvanized nails.
- For cedar, use ring-shank nails when possible for holding power.
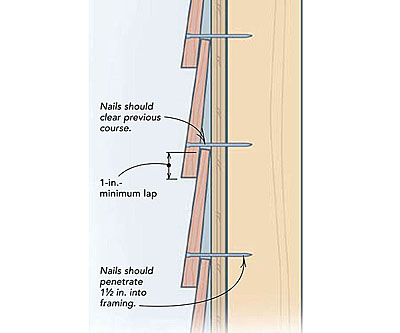
- Nail through the thick part of the board into the framing or furring strip.
- Space nails about 16 inches on center into studs, or follow manufacturer specs.
-
Leave proper gaps and allow movement
- Leave 1/8 inch to 1/4 inch at board ends and corners for expansion.
- Provide a 1/4 inch gap between siding and trim.
- For vertical siding, provide a gap at the top for movement.
-
Overlap and shiplap details
- For lap siding, overlap the top board over the lower one by the recommended exposure.
- For shingles, follow the exposure chart for your climate (commonly 5–7 inches).
- Keep courses straight using a chalk line.
-
Nailing technique
- Drive nails flush or slightly countersunk but do not crush the wood.
- For cedar, avoid overdriving nails. It can split the board.
- Pre-drill near ends on thin or brittle pieces to prevent splitting.
-
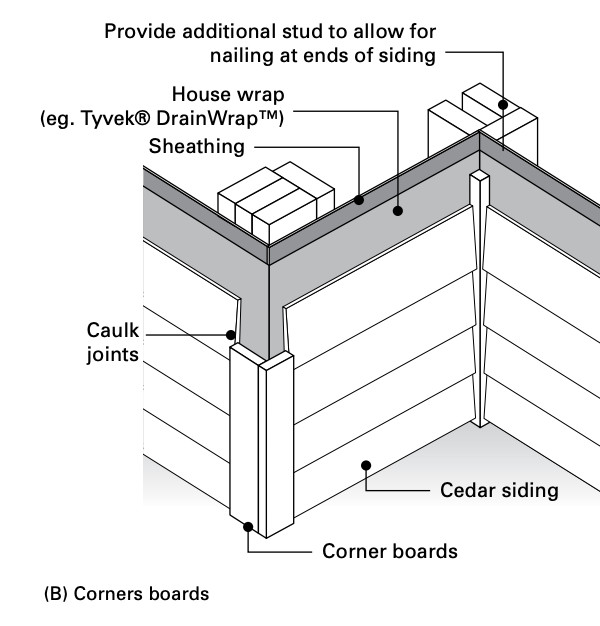
Around openings and corners
- Flash windows and doors first, then install siding.
- Use corner boards or mitered corners. Nail to the framing, not just the siding.
- Trim and caulk exposed joints to shed water.
-
Ventilation and rain-screen
- If possible, use a rain-screen approach with vertical furring.
- Leave an air gap behind siding to dry the wall sheathing.
- This improves longevity and helps prevent rot.
From years of fieldwork, I learned to double-check starter lines and flashing. A small misalignment on day one means big fixes later. Take the time to get these steps right.
Finishing, staining, and maintenance after you attach cedar siding
Finish the siding to extend its life. Cedar takes finish well but needs care.
- Choose stain or paint based on your style and sun exposure.
- Use a breathable, UV-resistant finish for natural color maintenance.
- Apply a water repellent preservative before staining if required.
- Re-stain or repaint every 3–7 years depending on exposure.
- Inspect yearly for loose nails, damaged boards, or failed caulk.
- Clean mildew with mild detergent and a soft brush.
I once skipped sealing cut ends during install. Those ends weathered fast and required early board replacement. Seal cut ends right away.
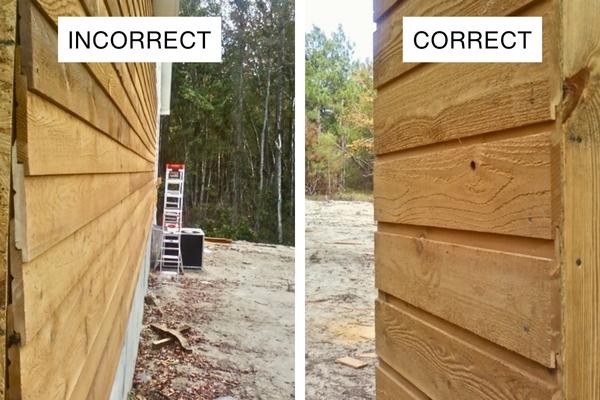
Common mistakes and troubleshooting when you attach cedar siding
Avoid these usual errors. They cause leaks, warping, and early failure.
- Not using the correct nails. Cheap nails corrode and stain wood.
- Skipping flashing at openings. This causes leaks.
- Failing to allow movement. Tight joints cause buckling.
- Ignoring ventilation. Siding without air gap traps moisture.
- Overdriving nails. This crushes fibers and reduces holding.
If boards split, replace or sister a new board over the damaged area. If you see black streaks, check for metal corrosion or mildew.
Cost, time, and permits for how to attach cedar siding
Budget and timing matter. Plan ahead.
- Cost factors: cedar grade, trim detail, labor, and finish.
- Expect higher material cost than vinyl, but a premium look.
- A typical wall crew can install 100–200 square feet per day depending on complexity.
- Check local permits and code rules before you start.
- Factor in scaffold or lift rental for multi-story homes.
I recommend getting at least two bids if hiring a pro. Also verify contractor insurance and references.

Frequently Asked Questions of how to attach cedar siding
What fasteners should I use when I attach cedar siding?
Use stainless-steel or hot-dipped galvanized nails designed for siding. Ring-shank nails improve holding strength and resist pull-out.
How much gap should I leave between cedar boards?
Leave about 1/8 inch to 1/4 inch between board ends and at trim edges. This gap allows for seasonal expansion and contraction.
Do I need a rain screen when I attach cedar siding?
A rain screen is highly recommended. It creates an air gap that lets moisture dry and reduces rot risk.
How do I flash windows when I attach cedar siding?
Install head flashing first, then side flashing, and finally sill flashing. Overlap each layer to shed water away from the opening.
Can I paint cedar after I attach cedar siding?
Yes. Paint or stain are both options. Use a breathable, exterior-grade finish and maintain it on a routine schedule.
How long should I wait to stain new cedar after I attach cedar siding?
Wait until the wood is dry and has weathered slightly, usually a few weeks to a few months, depending on climate. Pre-treat cut ends immediately to reduce checking.
Conclusion
You can confidently learn how to attach cedar siding by preparing the wall, using the right tools, nailing correctly, and adding proper flashing and ventilation. Take your time on layout and starter courses. Seal cut ends and maintain finishes to protect your investment. Start with a small wall or consult a pro if the work feels complex. If you enjoyed this guide, try a practice panel, subscribe for more tips, or leave a comment with your questions.