
Set up the TM10, measure and mark, clamp the siding, and make smooth, controlled bends in passes.
I have spent years working with siding brakes and metal trim tools. In this guide I explain how to use Van Mark's TM10 portable siding brake with clear steps, practical tips, and safety guidance. You will learn setup, operation, common bends, maintenance, and troubleshooting—all based on hands-on experience and industry best practices. Read on to master the TM10 and improve efficiency and accuracy on every siding or trim job.
Why choose the Van Mark TM10 portable siding brake
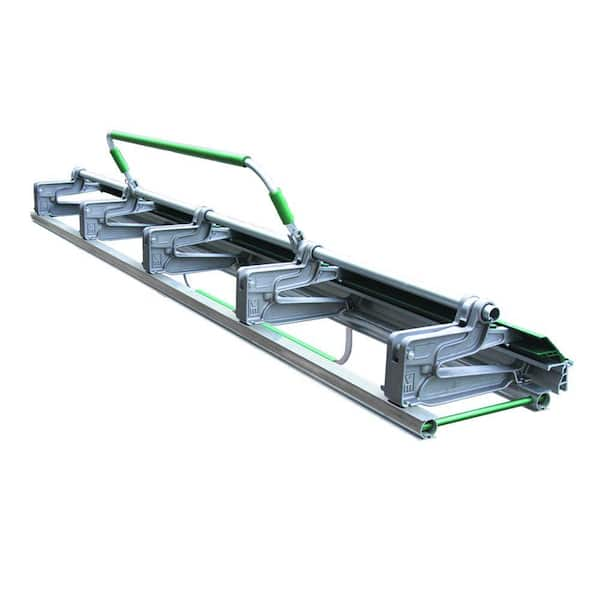
The TM10 is a compact, portable brake built for quick onsite bending and accurate trim work. It balances strength and portability so roofers, siding installers, and metalworkers can make straight, clean bends without hauling large equipment.
Key benefits include:
- Portability and light weight for one-person transport.
- Durable cast-aluminum parts and a rigid clamping bar that reduce twist.
- Quick setup for common bends like hem, offset, and box forms.
- High repeatability for consistent production on small jobs.
Choosing the TM10 helps crews save time and reduce material waste when making short runs, flashings, and trim. For projects that need mobility and precision, the TM10 fits the need well.

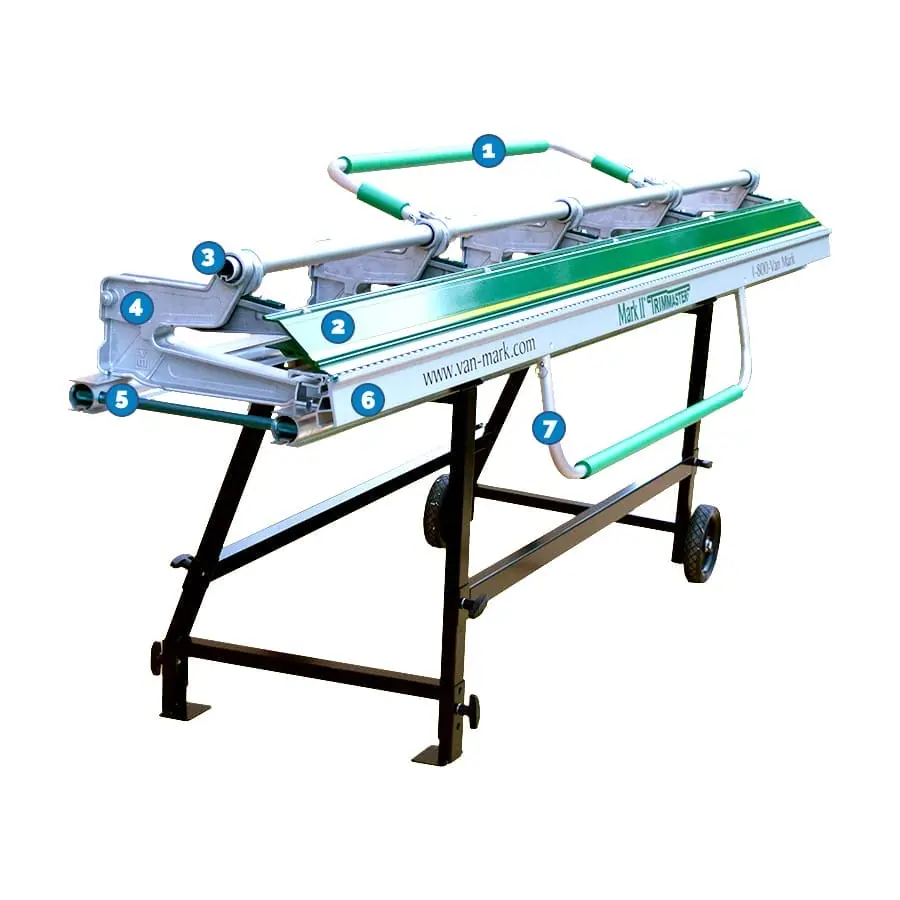
TM10 specifications and main components
Knowing the parts helps you use the tool safely and effectively. The TM10 includes:
- Main clamp bar that secures the sheet.
- Folding bending leaf that forms the bend.
- End stops and measurement markings for repeat bends.
- Support feet and mounting points for tables or workstands.
- Quick-release clamps and adjustment hardware.
Typical specs you should check:
- Maximum bend length for the TM10 model.
- Material thickness capacity (gauge limits for steel, aluminum).
- Maximum bend angle and radius limitations.
Review the manual for exact specs before bending unfamiliar material. Using the TM10 within rated limits prevents damage and poor bends.

Preparing and setting up the TM10
Preparation is critical for accurate results and safety. Follow these steps before you bend:
- Inspect the tool for damage and ensure moving parts move freely.
- Mount the TM10 on a stable table or sawhorses using its feet and fasteners.
- Clean the clamping surfaces to remove dirt or paint that can mar material.
- Measure and mark the sheet for the bend line using a square and fine marker.
- Set end stops or use a straight edge to align repeat bends.
A stable base and clean clamping surface yield straighter bends and reduce chatter. Take time here to avoid rework.

Step-by-step: how to use van mark's tm10 portable siding brake
This section walks through a basic bending operation. Follow each step carefully:
- Position the material
- Insert the sheet between the clamp bar and the bending leaf.
- Align the marked bend line with the edge of the clamp bar.
- Tighten the clamp
- Gradually tighten the clamp so the sheet cannot slip.
- Check alignment after a light clamp and correct as needed.
- Set the bend angle
- Lift the bending leaf to the desired angle by steady, even pressure.
- Use angle gauges or a simple protractor for critical angles.
- Make the bend in controlled passes
- For thicker metal, form the bend in two or three increments rather than one forceful motion.
- Open and reclamp if you need to adjust or refine the angle.
- Release and inspect
- Slowly loosen the clamp and remove the part.
- Inspect the bend for straightness and the inside radius for cracks or tool marks.
Repeat practice bends on scrap to refine your speed and feel. When you master these steps you will handle complex shapes confidently.

Bending techniques, common profiles, and tips
Different profiles need different techniques. Use these tactics for common shapes:
- Hem and return
- Score or use a lighter first pass for tight hems.
- Fold in two stages for a clean inner radius.
- Box and pan
- Use consistent, equal passes on each side to keep edges square.
- Check squareness against a try square during forming.
- Offset bends
- Set a measured setback and bend in two opposing operations to avoid twist.
- Long bends
- Support the material along its length to prevent sag.
- Use a straight edge or fence to maintain a straight fold.
Practical tips:
- Always make a test bend on scrap of the same gauge.
- Use protective pads when working with softer metals to avoid marks.
- When bending very thin aluminum, use slower, steady force to avoid kinking.
Safety, maintenance, and troubleshooting
Safety and maintenance extend tool life and protect operators. Follow these guidelines:
- Safety basics
- Wear gloves, eye protection, and hearing protection when needed.
- Keep fingers away from the clamping edge during operation.
- Maintenance
- Clean and lubricate pivot points periodically.
- Inspect for cracks in the clamp bar and worn fasteners.
- Replace damaged parts according to the manual.
- Troubleshooting common issues
- If bends are uneven, check for loose mounting or warped clamp bar.
- If metal kinks, slow the motion and use smaller incremental bends.
- If the clamp slips, clean the clamping faces and tighten properly.
Regular checks and simple care keep the TM10 reliable for years.

Real-world experience, common mistakes, and lessons learned
From the field, a few lessons stand out from using the TM10:
- Mistake: Rushing without test pieces.
- Lesson: Always run a scrap piece to confirm settings; saves time and material.
- Mistake: Over-tightening and damaging thin sheets.
- Lesson: Clamp firm but not crushing; feel is important.
- Mistake: Mounting on an unstable surface.
- Lesson: Secure the TM10 to a flat, rigid table to avoid twist and poor bends.
Personal tip: For jobs that require many identical pieces, mark a jig or stop block and log the clamp position. This small step boosted my speed by 30% on repetitive jobs. Another useful practice was numbering parts and matching each to the bend order to reduce assembly errors.

Frequently Asked Questions of how to use van mark's tm10 portable siding brake
How thick of metal can the TM10 bend safely?
The TM10 will bend common siding gauges like 24 to 26 gauge steel and most thin aluminum sheets safely; check the manual for exact maximum thickness. Always test on scrap to confirm how your specific material responds.
Can one person operate the TM10 alone?
Yes; the TM10 is designed for portability and one-person use on short lengths. For long pieces, a second person or extra supports will improve control and accuracy.
How do I prevent scratches or marks on the material?
Use clean clamp faces, protective pads, or soft jaws when working with finished siding or painted metal. Keep dirt and grit off the clamp bar and material.
What do I do if the bend is not straight along the length?
Check tool mounting and support under the workpiece. Re-mount the TM10 on a flat table, and use additional supports or a straight edge to guide long bends.
How often should I service the TM10?
Inspect and clean after each job; lubricate pivot points monthly with regular use. Replace worn parts as soon as you notice play or damage to maintain accuracy.
Conclusion
Mastering how to use Van Mark's TM10 portable siding brake comes down to good setup, measured practice, and consistent care. Follow the steps here, test with scrap, and keep the tool maintained to get precise bends and long service life. Put these tips into practice on your next job, refine your technique, and share results or questions below to keep improving.