
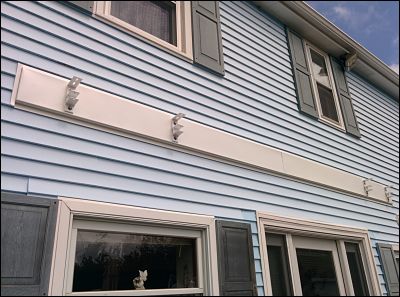
Attach awning brackets to house trim into studs, not only into vinyl siding.
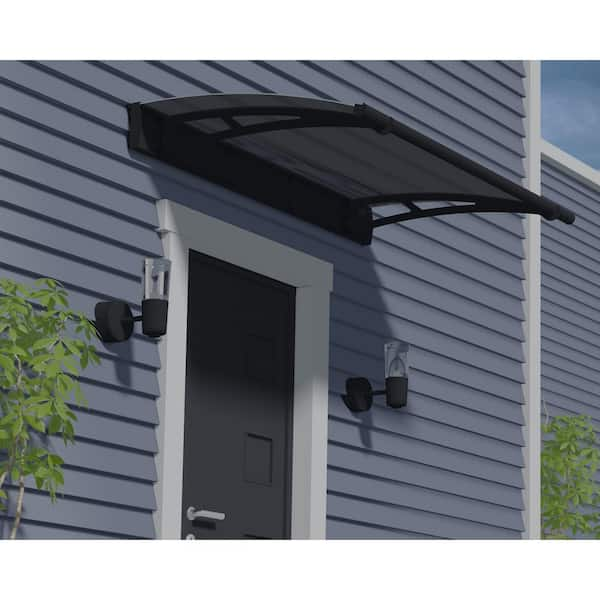
I’ve installed dozens of awnings on homes with vinyl siding, and I’ll walk you through a safe, lasting method for how to attach awning to vinyl siding. This guide covers planning, tools, fasteners, and step-by-step installation so you can avoid common mistakes and keep your house dry and sturdy.

Why vinyl siding needs special care
Vinyl siding is a weather-resistant cladding, not a structural backing. When you learn how to attach awning to vinyl siding, you must reach the house structure behind the siding. Fastening only to the vinyl will cause pull-out, water issues, and warped siding. I’ll show you how to transfer loads to studs or blocking while preserving the siding’s weather seal.

Tools, materials, and hardware you’ll need
Plan and gather what you need before starting. Below is a concise checklist for how to attach awning to vinyl siding safely.
- Tools
- Drill with wood and masonry bits
- Socket set or impact driver
- Level and measuring tape
- Reciprocating saw (for cutting siding)
- Caulk gun and utility knife
- Materials
- Awning and mounting brackets
- 1×4 or 2x blocking for backing (treated or exterior-grade)
- Stainless steel lag screws or structural bolts
- Exterior-grade sealant and flashing
- Vinyl siding J-channel or trim pieces
- Safety gear
- Safety glasses and gloves
- Ladder or scaffolding rated for two people
:no_upscale()/cdn.vox-cdn.com/uploads/chorus_asset/file/19511484/14_norm_advice.jpg)
Choose the correct mounting method
There are three common ways to attach an awning to a vinyl-sided wall. Choose based on wall type and awning weight.
- Mount to wall studs
- Best for heavy awnings.
- You remove siding where brackets sit and screw directly into studs.
- Use blocking between studs
- Install a horizontal blocking board between studs at the awning’s mounting level.
- Attach brackets to the blocking for even load distribution.
- Mount to a ledger or header framed into the house
- Construct a structural header that carries load to studs or rim joist.
- Often used for large or cantilevered awnings.
For how to attach awning to vinyl siding, I prefer blocking or ledger methods for medium-sized awnings on older homes. They give secure support while simplifying sealing and flashing.

Step-by-step: how to attach awning to vinyl siding
Follow these steps. Read all steps first, then work methodically.
-
Plan and mark
- Find studs with a stud finder and mark them.
- Measure and mark the awning height and bracket positions.
- Double-check clearances for windows, doors, and gutters.
-
Remove siding at mount points
- Cut a vertical section of siding where each bracket will sit.
- Keep siding pieces for reuse. Trim carefully to avoid cracking.
-
Install blocking or ledger
- Fit a treated 1x blocking board between studs or attach a ledger into studs.
- Use marine-grade screws or structural lag bolts into studs.
- Make sure blocking is perfectly level.
-
Flash and seal the opening
- Install metal flashing above and behind the blocking.
- Apply exterior grade sealant between flashing, blocking, and house wrap.
- Reinstall siding pieces around the flashing, using J-channel if needed.
-
Mount the awning brackets
- Position brackets on the blocking or ledger and level them.
- Use stainless steel lag screws sized per bracket manufacturer instructions.
- Drive fasteners into solid framing, not just siding.
-
Attach the awning
- Lift or hoist the awning onto the mounted brackets.
- Tighten bolts and confirm level and alignment.
- Seal bolt heads and bracket edges with exterior-grade caulk.
-
Final checks
- Test stability by applying moderate force.
- Check for gaps where water can enter and re-seal as needed.
- Clean up and replace any trim.
This practical approach to how to attach awning to vinyl siding helps prevent leaks and structural failure. I learned this after a neighbor’s awning popped out from poor fastening into siding only.

Waterproofing and flashing details
Water intrusion is the main risk when learning how to attach awning to vinyl siding. Use these steps to keep water out.
- Step 1: Install a continuous metal flashing above the blocking.
- Step 2: Slip the siding back under the top edge of the flashing where possible.
- Step 3: Use high-quality exterior sealant at every fastener and seam.
- Step 4: Add drip edge or sloped flashing to direct water away from the mount.
I once retrofitted flashing under a poorly mounted awning. The fix stopped slow leaks that had damaged the wall sheathing. Small waterproofing steps prevent big repairs.

Common mistakes and how to avoid them
Avoid these errors when deciding how to attach awning to vinyl siding.
- Mistake: Screwing into vinyl only
- Fix: Always reach framing with fasteners.
- Mistake: Skipping flashing
- Fix: Install flashing and caulk every seam.
- Mistake: Using the wrong fasteners
- Fix: Use stainless steel structural lag screws sized to bracket specs.
- Mistake: Poor leveling
- Fix: Level blocking before final fastening; recheck during installation.
These are lessons I learned the hard way. A single extra flange of flashing saved me time and money on an installation.
Maintenance tips after installation
An awning installed correctly will still need some care. For how to attach awning to vinyl siding, maintenance ensures longevity.
- Inspect anchors and sealant annually for cracks or rust.
- Re-caulk around fasteners if sealant pulls away.
- Remove snow load quickly to prevent sagging.
- Tighten bolts seasonally, especially after storms.
A light annual check takes 10 minutes and prevents costly rework later.

Which fasteners and hardware to use
The right hardware matters more than you might think when learning how to attach awning to vinyl siding.
- Use stainless steel or hot-dipped galvanized lag screws.
- Size the lag screws to penetrate at least 1.5 to 2 inches into studs.
- Use washers under bolt heads to spread load.
- Consider structural bolts for heavy, cantilevered awnings.
I prefer stainless steel for coastal or humid climates. It prevents staining and corrosion that can ruin both awning and siding.
Cost considerations and timeline
Costs vary by awning size, wall condition, and local labor rates. Typical ranges and timeline when considering how to attach awning to vinyl siding:
- Materials for DIY: $60 to $300 depending on blocking, flashing, and fasteners.
- Professional install: $300 to $1,200 or more based on complexity.
- Timeline: A single small awning can be done in 4–8 hours by an experienced DIYer. Larger jobs or ledger work may take a day or weekend.
Budget a bit more for quality flashing and stainless fasteners. Cheap fasteners create long-term problems.
Personal tips from experience
I’ve installed awnings on ranch homes, split-levels, and townhouses. These tips worked best:
- Label siding pieces as you remove them. They fit back better that way.
- Pre-drill through siding and flashing at a slow speed to avoid cracking.
- Bring a friend for lifting; many awnings are awkward, not heavy.
- When in doubt, add a short vertical trim to hide a neat flashing detail.
These small steps saved me hours and made installations look professional.
Frequently Asked Questions of how to attach awning to vinyl siding
How deep should lag screws go when attaching an awning to vinyl siding?
Lag screws should penetrate at least 1.5 to 2 inches into the house framing or studs to ensure a secure hold.
Can I attach an awning directly to vinyl siding without removing it?
No. You must remove siding at mount points and fasten to studs, blocking, or a ledger to prevent pull-out and leaks.
Do I need flashing when installing an awning on vinyl siding?
Yes. Flashing is essential to direct water away from the mount and protect the wall sheathing from moisture.
What fasteners are best for coastal areas?
Stainless steel lag screws and bolts resist corrosion and are the best choice in coastal or humid climates.
How do I find studs behind vinyl siding?
Use a stud finder on the sheathing or carefully remove a small siding section to locate studs visually and mark them.
Conclusion
You can have a solid, leak-free awning by following a proven method for how to attach awning to vinyl siding: locate studs, install blocking or a ledger, apply proper flashing and sealant, and use the right fasteners. Take your time, follow the steps, and don’t skip waterproofing. If you prefer a professional touch, hire a reputable contractor for heavy or complex awnings. Try one small project this weekend, check your work, and share your results or questions below — I’d love to help.