
Build a simple, accurate siding brake using steel, hinges, and a hand seamer.
I have built and used multiple shop-made tools and know how to make a siding brake that is strong, precise, and cost-effective. This guide walks you through clear steps, materials, design choices, and safety tips so you can confidently build a siding brake that fits your projects and skill level.
What is a siding brake and why build one
A siding brake is a metal bending tool designed for cold-forming siding panels, flashing, and trim. It holds a sheet of metal and forms straight bends along its length. Knowing how to make a siding brake helps you customize width, bending angle, and capacity for vinyl, aluminum, or thin steel siding.
Common uses include forming drip edges, Z-flashings, and small custom trim. Building your own lets you control size and save money compared to buying a commercial brake. It also teaches valuable metalworking skills and enables fast on-site adjustments.

Tools and materials needed to make a siding brake
Choose durable parts to get accurate bends and long life. Below is a practical list for a shop-built siding brake.
Materials
- 1/4-inch steel plate for the base, sized to your desired brake length.
- 1/8- to 3/16-inch steel for bending leaf and clamping bar.
- Heavy-duty piano hinge or two parallel hinges rated for shop use.
- Angle iron or square tubing for support ribs.
- Hex head bolts, lock nuts, and hardened washers.
- Steel rod or shaft for hinge reinforcement if needed.
- Rubber or wood handle for comfortable operation.
- Paint or rust-preventive coating.
Tools
- Angle grinder or metal saw for cutting steel.
- Drill and bits for metal.
- Welding machine (MIG or stick) or high-strength bolts for assembly.
- Square, tape measure, and combination set.
- Clamps and a vise for assembly and alignment.
- Hand seamer or small mallet for test bends.

Step-by-step: How to make a siding brake
Follow these steps to build a functional siding brake. Each step is simple and keeps alignment tight.
- Plan the brake length and bending capacity
- Decide the maximum panel width and material thickness you will form.
- Typical shop-built brakes are 24 to 48 inches long and bend up to 22 gauge steel or 0.040-inch aluminum.
- Cut and prepare the base
- Cut a 1/4-inch steel plate to your chosen length and width.
- Square the edges and mark centerlines for hinge placement.
- Fabricate the bending leaf and clamping bar
- Cut the bending leaf from 3/16-inch steel. Make it the same length as the base.
- Cut the clamping bar from 1/8-inch steel to match the leaf width.
- Chamfer or file the edges to prevent nicking siding.
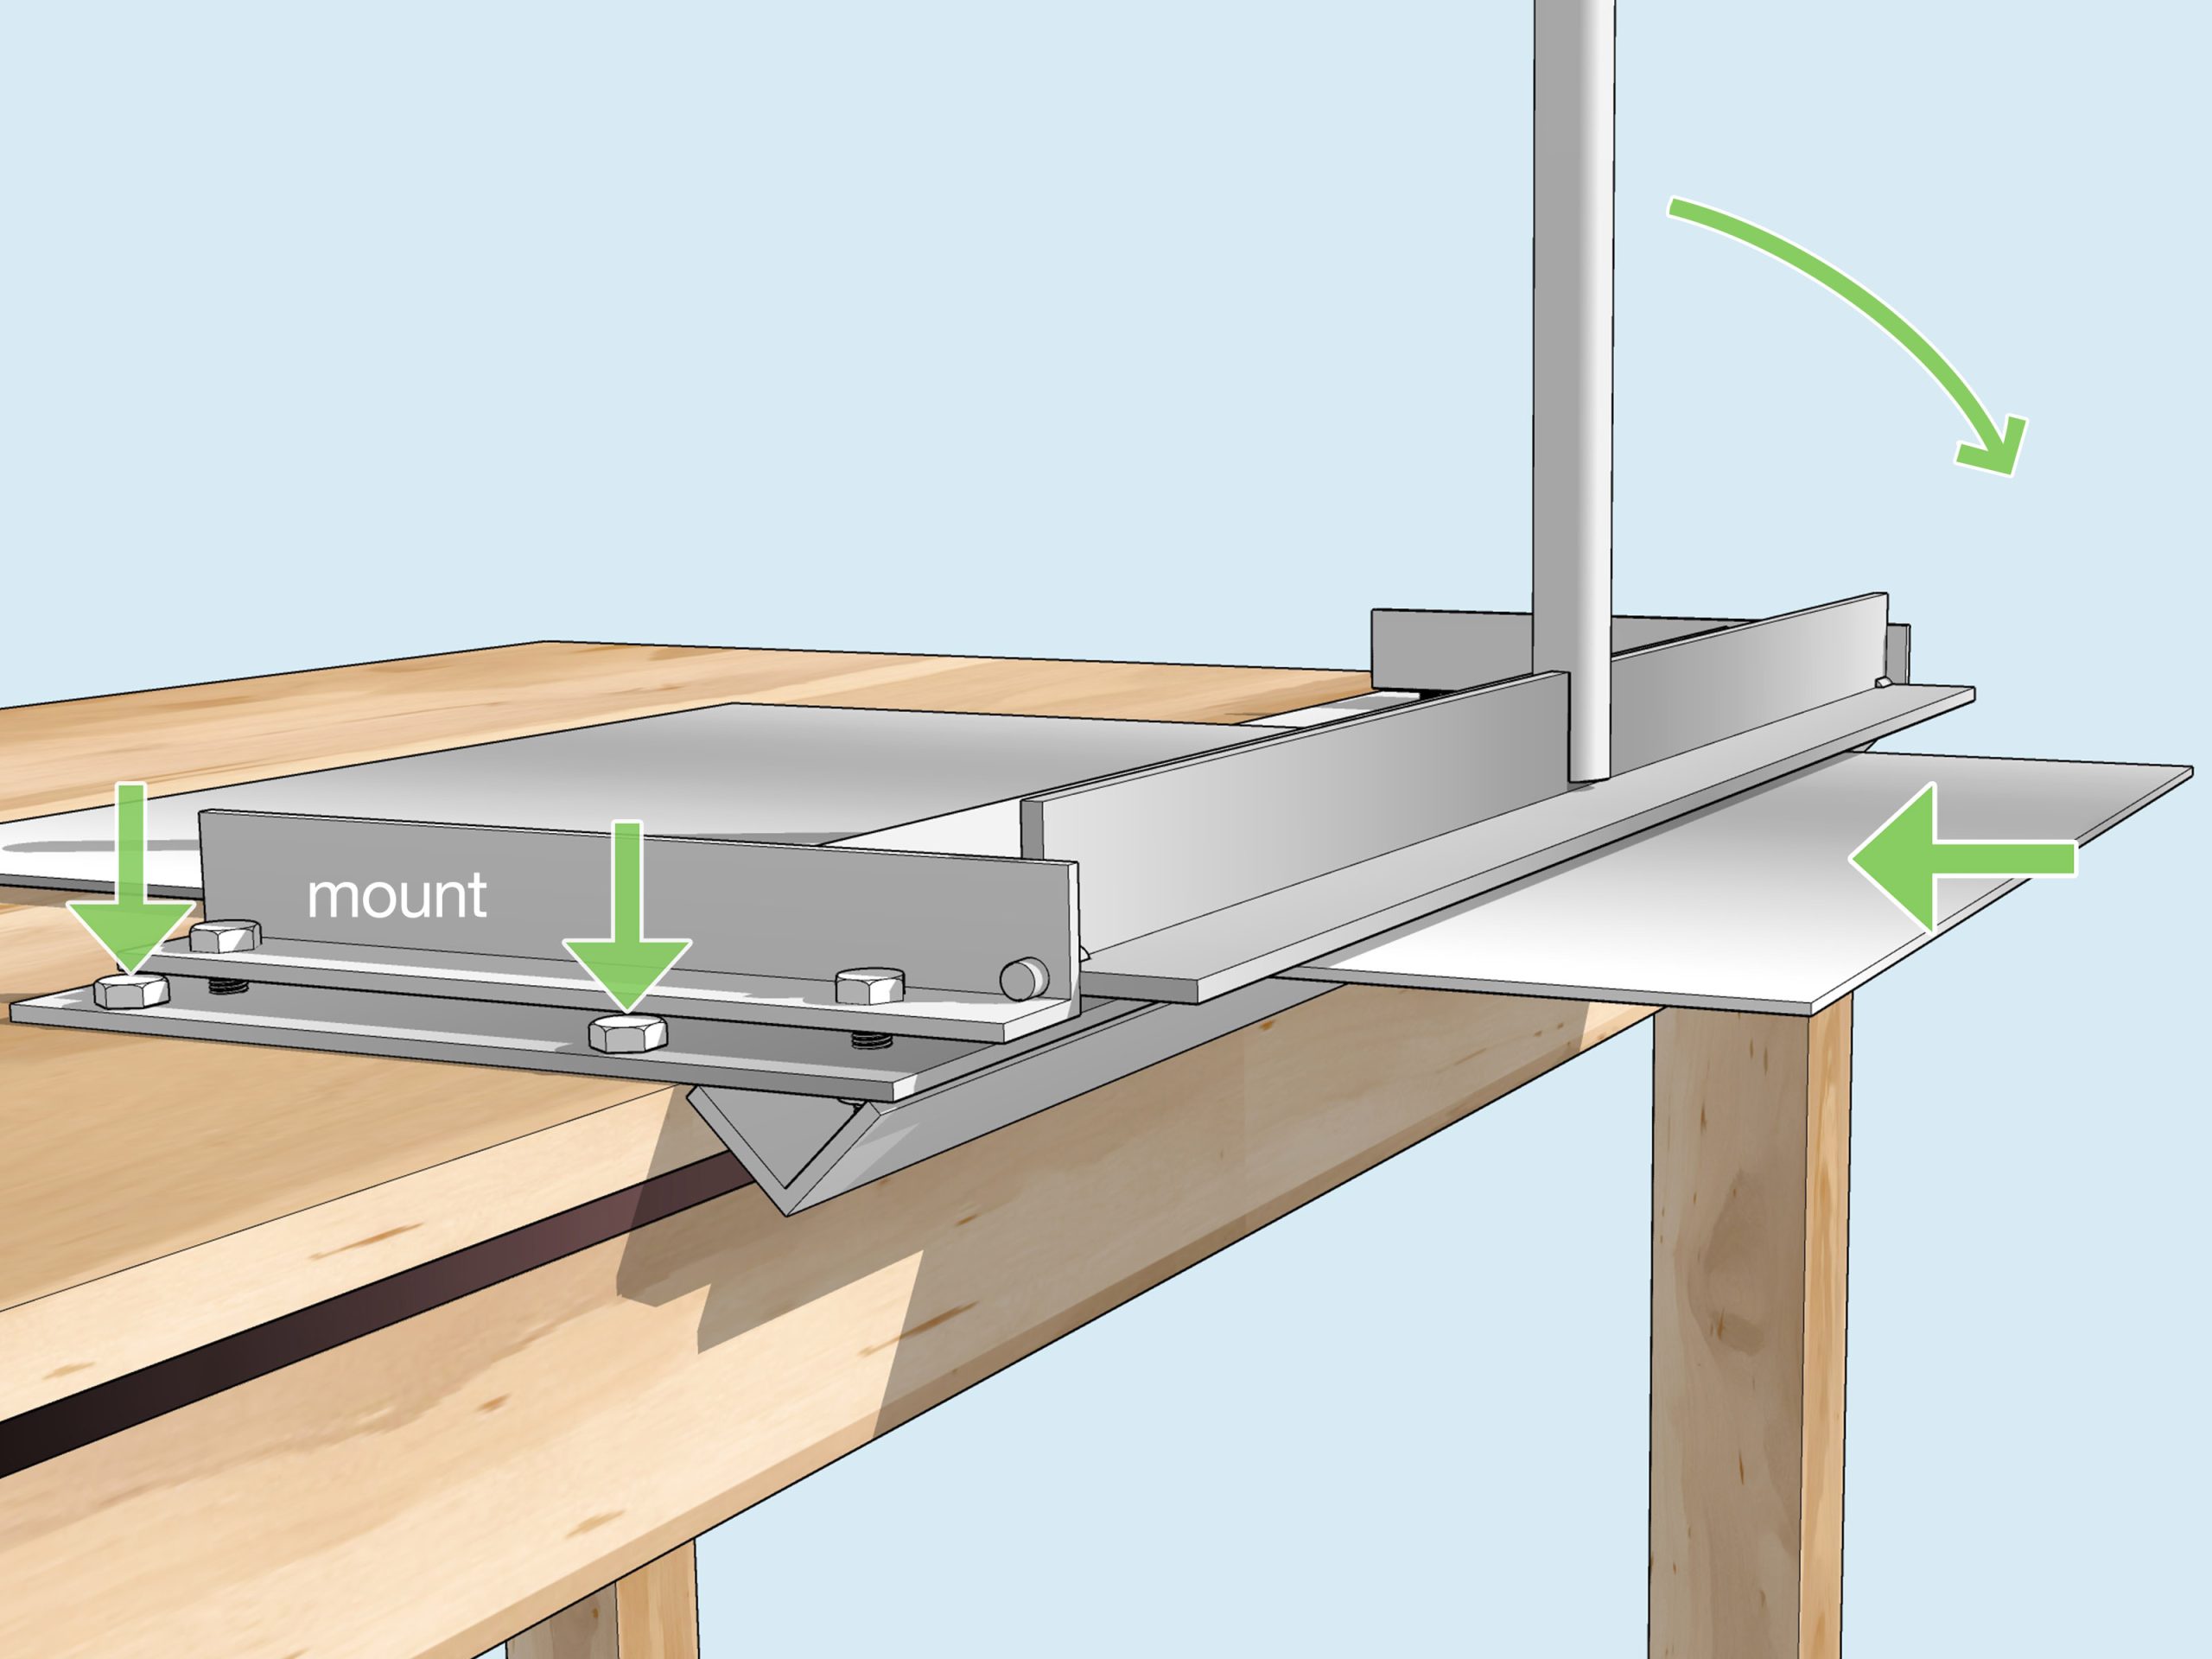
- Attach hinges and set alignment
- Align the bending leaf next to the base with a 1/8- to 1/4-inch gap for material thickness.
- Mount a piano hinge along the length where leaf meets base. Use bolts or weld for strength.
- Ensure the hinge axis is straight to prevent twisting during bending.
- Add support ribs and stops
- Weld or bolt angle iron ribs under the base to prevent flexing when pressure is applied.
- Add a removable stop plate to control bend angle or to repeat identical bends.
- Fit the clamping bar
- Install the clamping bar above the leaf using bolts that allow tightening by hand or with a wrench.
- Use slots instead of round holes to let the clamp shift for even pressure.
- Reinforce hinge and handle
- Install a steel shaft or rod through hinge barrels for extra strength on long brakes.
- Attach a handle to the leaf to lift and lower it smoothly.
- Test and adjust
- Start with scrap metal. Tighten the clamp and make small test bends.
- Adjust hinge alignment, clamp pressure, or add packing strips to get clean bends.
- Final finish
- File sharp edges and paint the brake to prevent rust.
- Add rubber feet or bolt the brake to a workbench for stability.

Design variations and measurements
Design choices depend on the materials and parts you will form. Keep designs simple and modular.
Common variations
- Bench brake: A short brake mounted to a bench. Good for trims and short pieces.
- Hand brake: A lighter brake that you lift by hand. Works for thin aluminum siding.
- Box-and-pan brake style: Adds fingers for complex box bends. Requires careful spacing.
Key measurements
- Brake length: Choose a length that suits your longest pieces. Longer brakes need stronger ribs.
- Clamp gap: Set the clamp gap slightly larger than your thickest siding.
- Hinge offset: Keep the hinge axis close to the clamp edge to reduce twisting.
- Bend radius: A small radius is fine for thin aluminum. Steel may require a larger radius to avoid cracking.
Practical example
- For aluminum trim up to 0.032 in, build a 36-inch brake with a 1/8-inch clamp gap and 3/16-inch bending leaf thickness. Reinforce with two 1/4-inch ribs.

Safety, testing, and maintenance
Safety keeps your brake reliable and your work safe. Simple checks prevent accidents.
Safety steps
- Wear gloves and eye protection when cutting, welding, or bending metal.
- Secure the brake to a bench so it does not move during use.
- Keep hands clear of clamp jaws when lowering the leaf.
Testing routine
- Test on scrap before bending a finished part.
- Inspect hinges and bolts for looseness after every few uses.
- Check for metal fatigue or cracks around welded areas.
Maintenance tips
- Tighten bolts and re-weld as needed to maintain rigidity.
- Lubricate hinge pins with light oil to keep movement smooth.
- Repaint exposed steel to prevent rust.
Limitations and warnings
- Home-built brakes are not substitutes for heavy industrial brakes for thick gauge steel.
- Do not attempt high-capacity bends without proper reinforcement and design calculation.

Costs, benefits, and limitations of a DIY siding brake
Building your own brake has clear pros and cons. Consider these before starting.
Benefits
- Lower cost than commercial brakes for similar length.
- Customizable to exact project needs and workspace.
- Learning experience and hands-on control of quality.
Costs
- Material costs vary; expect to spend for steel, hinge, and fasteners.
- Tools such as welders add to initial expense if you do not already own them.
Limitations
- Home-made brakes have limits on thickness and repeatability compared to pro brakes.
- Precision hinges and fabrication matter. Poor alignment will produce uneven bends.

Tips, common mistakes, and personal experience
I built my first siding brake from leftover steel. I learned key lessons fast. These tips save time and rework.
Tips
- Start with a short brake to learn bending behavior before building a long one.
- Use slots for clamp bolts to allow adjustment and even pressure.
- Reinforce the base with ribs if you plan long bends or thicker material.
Common mistakes
- Mounting the hinge off-center, which causes twist during bends.
- Using a weak clamping bar that flexes under pressure.
- Skipping test bends and wasting finished material.
Personal insight
- I once welded a hinge slightly crooked. It caused uneven bends until I ground and re-welded it. Take time to align parts before final welding. Small alignment checks early save hours later.

Frequently Asked Questions of how to make a siding brake(make it h2 tag)
What materials are best for a DIY siding brake?
Steel provides the best strength and durability. Use 1/4-inch for the base and 1/8- to 3/16-inch for the leaf and clamp for typical siding work.
How long should my siding brake be?
Choose a length based on your longest pieces. Common shop lengths are 24 to 48 inches; longer brakes require stronger reinforcement.
Can I bend aluminum siding with a homemade siding brake?
Yes. A homemade siding brake can bend aluminum up to typical siding thicknesses if the clamp gap and hinge alignment are correct.
Do I need a welder to make a siding brake?
A welder makes the build stronger and easier, but you can bolt components together if you design for strong bolted joints.
How do I avoid creases or uneven bends?
Ensure hinge alignment, even clamp pressure, and test with scrap metal. Use packing strips under the clamp if needed to distribute pressure.
Is a DIY siding brake safe to use on thick steel?
Not usually. Home-built brakes are best for light to medium thickness. For thick steel, use a factory-built brake rated for that gauge.
Conclusion
Building your own siding brake is practical, affordable, and empowering. You get a tool tailored to your needs and skills, and you learn useful metalworking techniques. Start with a clear plan, use the right materials, and test on scrap. With patience and proper alignment, your homemade siding brake will deliver accurate bends and reliable performance. Try a short prototype brake first, then scale up. Share your results, ask questions, or subscribe for more shop guides.