
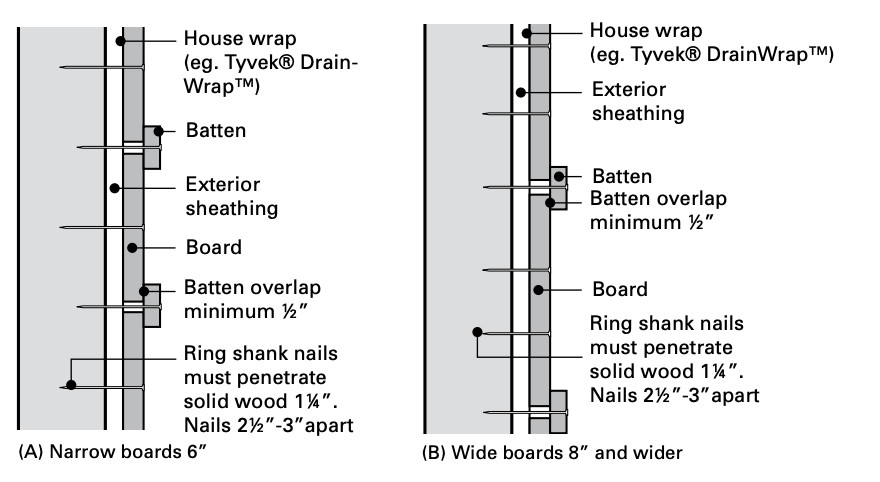
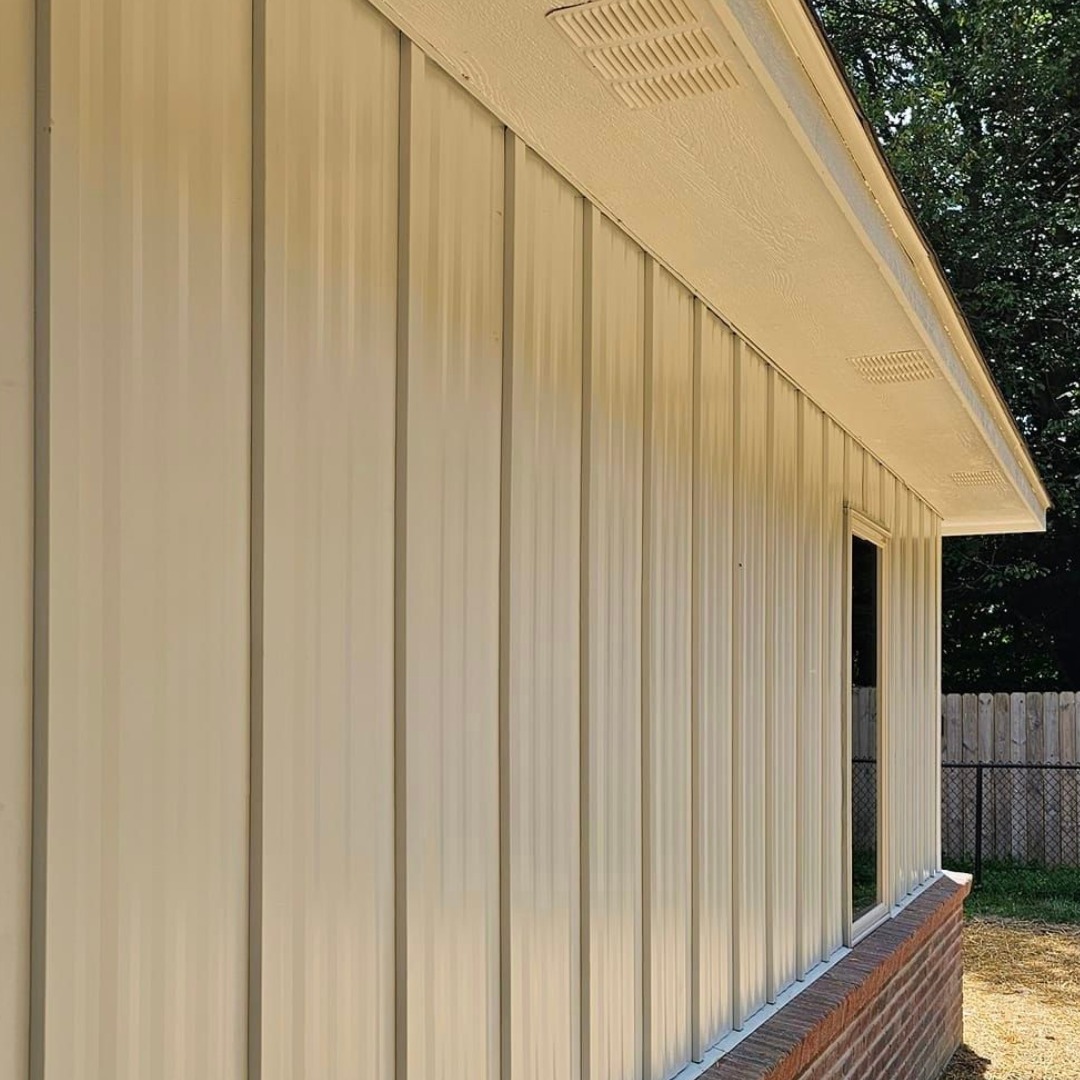
Board and batten siding is installed by fitting wide boards with narrow battens over the seams.
I have installed and supervised many siding projects over the last decade. In this guide I explain how to board and batten siding step by step. You will get clear planning tips, tool lists, exact installation steps, and real-world lessons I learned on jobs. Read on to learn practical, safe, and durable ways to add board and batten siding to a home.

What is board and batten siding?
Board and batten siding is a classic exterior finish. It uses wide vertical boards with narrow strips, called battens, covering the seams. The look is clean, rustic, and tall. It works on homes, sheds, and garages.
This section explains why people choose board and batten, common materials, and the basic layout. Learning how to board and batten siding starts with these basics.
- Simple installation that fits modern and traditional styles.
- Strong seam coverage that helps block wind and rain.
- Visual height and texture for a home facade.
Types of board and batten:
- Wood: cedar, pine, or fir for a natural look.
- Engineered wood: more stable and cheaper than solid wood.
- Fiber cement: durable and fire resistant.
- PVC/composite: low maintenance and rot-proof.

Materials and tools you will need
Choosing the right materials makes how to board and batten siding easier. Use quality parts and correct fasteners.
Materials:
- Vertical boards: 1×8, 1×10, or 1×12 typical.
- Battens: 1×2 or 1×3 strips.
- House wrap or felt for moisture barrier.
- Flashing for windows and transitions.
- Nails or screws rated for exterior use.
- Caulk and primer/paint or stain.
Tools:
- Circular saw or table saw.
- Nail gun with proper nails or stainless screws.
- Level and chalk line.
- Tape measure and speed square.
- Pry bar and hammer.
- Caulk gun and paint tools.
Small extras that help:
- Shim stock for leveling.
- Galvanized or stainless fasteners.
- Drill bits and countersink set.

Planning and preparation
Good planning saves time when learning how to board and batten siding. Measure carefully and make a simple layout plan.
Steps to plan:
- Measure the wall height and width. Calculate board counts and batten spacing.
- Decide board widths and batten size. Common pattern: boards 8 to 12 inches, battens 1.5 to 2.5 inches.
- Check the wall sheathing. Replace rotten or soft spots first.
- Install house wrap and tape seams for a moisture barrier.
- Mark a level starter line at the bottom of the wall.
- Plan flashing at windows, doors, and rooflines.
Allowances:
- Leave 1/8 inch to 1/4 inch gap for wood expansion at ends and between boards.
- Add extra material for cuts and waste.
I always mark the full layout on paper and on the wall. That made installation faster and helped avoid surprises.

Step-by-step installation
Follow these steps to install board and batten siding. Keep lines straight and check level often.
- Prepare the wall
- Remove old siding where needed.
- Repair sheathing and install house wrap.
- Install flashing where required.
- Set a starter board
- Snap a level chalk line at the base.
- Install the first board on the starter line. Use longer fasteners into studs.
- Fasten boards vertically
- Place boards edge to edge or leave a small gap as planned.
- Fasten at each stud with two nails near edges.
- Check plumb with a level as you go.
- Space and layout battens
- Mark batten positions over seams.
- Typical spacing is at board seams or every 16 to 24 inches, depending on design.
- Install battens
- Cut battens to length.
- Fasten battens over seams, nailing into studs or blocking.
- Use two nails per end and one in the middle where needed.
- Trim around openings
- Install drip edge or flashing above windows and doors.
- Use jamb trim or stop molding for neat edges.
- Caulk and seal
- Caulk gaps at windows, doors, and corners.
- Use open-gap caulk where movement is expected.
- Prime and paint or stain
- Prime bare wood with an exterior primer.
- Paint or stain in two coats for best protection.
- Final checks
- Walk the perimeter and check fasteners, gaps, and finish.
- Touch up paint and seal exposed nail heads.
Practical tips I learned on job sites:
- Always fasten into a stud or blocking. Nails into sheathing alone fail.
- Use longer battens at corners to lock the look.
- Cut battens slightly long and trim after installation for perfect joints.
Common mistakes and how to avoid them
Avoid these common errors when you learn how to board and batten siding.
Mistake: Not using a moisture barrier
- Fix: Install house wrap and tape seams before siding.
Mistake: Nailing into sheathing only
- Fix: Fasten into studs or add solid blocking behind seams.
Mistake: No allowance for wood movement
- Fix: Leave small gaps and use flexible caulk where boards meet trim.
Mistake: Poor layout and uneven battens
- Fix: Snap chalk lines and pre-mark every batten location.
Mistake: Skipping priming and paint
- Fix: Always prime cut ends and paint two coats for weather protection.
My lesson: take time on layout. A straight line makes the whole wall look right.
Maintenance, painting, and repairs
Maintenance keeps board and batten siding lasting for decades. Inspect and act often.
Routine care:
- Inspect yearly for loose boards, rot, or failed caulk.
- Repaint or restain every 5 to 10 years depending on material and climate.
- Replace any rotted boards or battens promptly.
Easy repairs:
- Remove a damaged batten and slip in a new one.
- For board damage, replace the full board. Cut and fit new board, then re-install battens.
- Re-caulk gaps and touch up paint after repairs.
Use stainless or hot-dipped galvanized fasteners to reduce rust stains. Keep landscaping trimmed back to lower moisture risk.

Cost, time, and when to hire a pro
Costs vary by material and region. Know the basics before you decide how to board and batten siding.
Cost factors:
- Material type: wood is mid cost, fiber cement higher, PVC varies.
- Labor: DIY saves money but is time intensive.
- Wall complexity: many windows and corners increase cost.
Rough estimates:
- DIY materials only: $3 to $8 per square foot for common wood options.
- Installed by pros: $6 to $15 per square foot depending on material and labor rates.
Time estimates:
- A simple single-story wall can take a couple of days for two people.
- A full house can take several weeks depending on prep work.
When to hire a pro:
- You lack carpentry experience or proper tools.
- Walls need sheathing repairs or complex flashing.
- You need code compliance or warranty work.
I often recommend hiring a pro for large or complex homes. For a small shed, try the DIY route with careful planning.

Frequently Asked Questions of how to board and batten siding
What is the best board width for board and batten siding?
Common widths are 8 to 12 inches. Choose a width that matches your home's scale and the look you want.
Can board and batten be installed over existing siding?
Yes, in some cases. You must ensure the existing siding is stable and add furring strips or blocking to fasten into.
How much gap should I leave for wood expansion?
Leave about 1/8 to 1/4 inch at ends and between boards in humid climates. Use flexible caulk where needed.
Is board and batten siding energy efficient?
The siding itself does not add much insulation. Adding continuous insulation under the siding can improve energy performance.
How often should I paint or stain board and batten siding?
Plan to repaint or restain every 5 to 10 years. Check yearly for peeling or wear and touch up as needed.
Can I use fiber cement for board and batten?
Yes, fiber cement is a popular option. It resists rot and fire but needs proper cutting tools and fasteners.
Conclusion
Board and batten siding gives a home strong curb appeal and durable protection when done right. Learn how to board and batten siding by planning well, using the right materials, and following steady installation steps. Start small, practice precise layout, and hire a pro for tricky areas. Try one wall first or consult a contractor for an estimate. If you found this guide useful, share your questions, leave a comment, or subscribe for more step-by-step home improvement guides.